Reading List
The most recent articles from a list of feeds I subscribe to.
I finally learned how to RSVP using webmentions
Sometimes I feel like I am the only one struggling with how to put together all the pieces of the IndieWeb. I think I understand them all isolated but I struggle have vision with how they all connect. I think it is related to the way I learn which may be different from the majority of the people. I saw Neil's sketch of what is happening in his IndieWeb setup and... I don't have think I have anything similar to it.
One thing I struggle a lot is with Webmentions. I usually joke that I have a Webmention curse. I've tried many tools to try to get Webmentions in my blog but because I would use third party tools that always do magic stuff for me, I don't fully understand them. Even with all that magic I haven't been able to get it to work. My other struggle is that most Webmentions tools out there are built in languages I don't understand.
While at Homebrew Website Club London I told Calum and Neil that I wish I had "Webmentions working" so that I could RSVP to the event on the website. Turns out things are not that connected!
So, to practise what I preach, I decided to write down what I learned last Wednesday.
How RSVP using Webmentions work
- A blog entry or HTML page is created saying you're rsvping to an event using the correct microformats.
- The same blog entry or HTML page is used to send a webmention to the event in question.
Disclaimer:
- This is written based on how my blog works and it is built.
- Assuming you already use web sign-in and webmentions.io
- Some familarity with microformats.
- I couldn't manage to get syntax highlighting working on my blog so I will have to link to my Git Hub files. I'm sorry.
Create your RSVP template
At the time of writting this blog post I was using Jekyll but I am certain this applies to anything else. I based mine on the example available on the IndieWeb wiki's page for RSVPs. Also at the time of writing this blog post I had not added a particular style to my template but it is available in my GitHub.
Note: Make sure you add date to it. I didn't and it wasn't picking it up.
Create your post/page where you announce your RSVP
Because I am using Jekyll, I was able to create a blog post where I choose the template to be used. In my post, I wanted to RSVP to the event I was at: Homebrew Website Club London. So I created a blog post (available in my GitHub) where I specify my RSVP (in this case "yes"), the "targetName", "targetUrl" and all the other info to match my layout (don't forget "date").
The reason why this blog entry doesn't appear in my home page it is because I gave it a category called "rsvp" and when I list all my blog posts I am filtering them by category.
I now had a RSVP post.
Testing and debugging
Before I sent my RSVP, Calum advised me to test it. One way you can do it is using pin13. I'm really glad I did because in fact, my first attempt was missing important details and it wasn't sending all the necessary info.
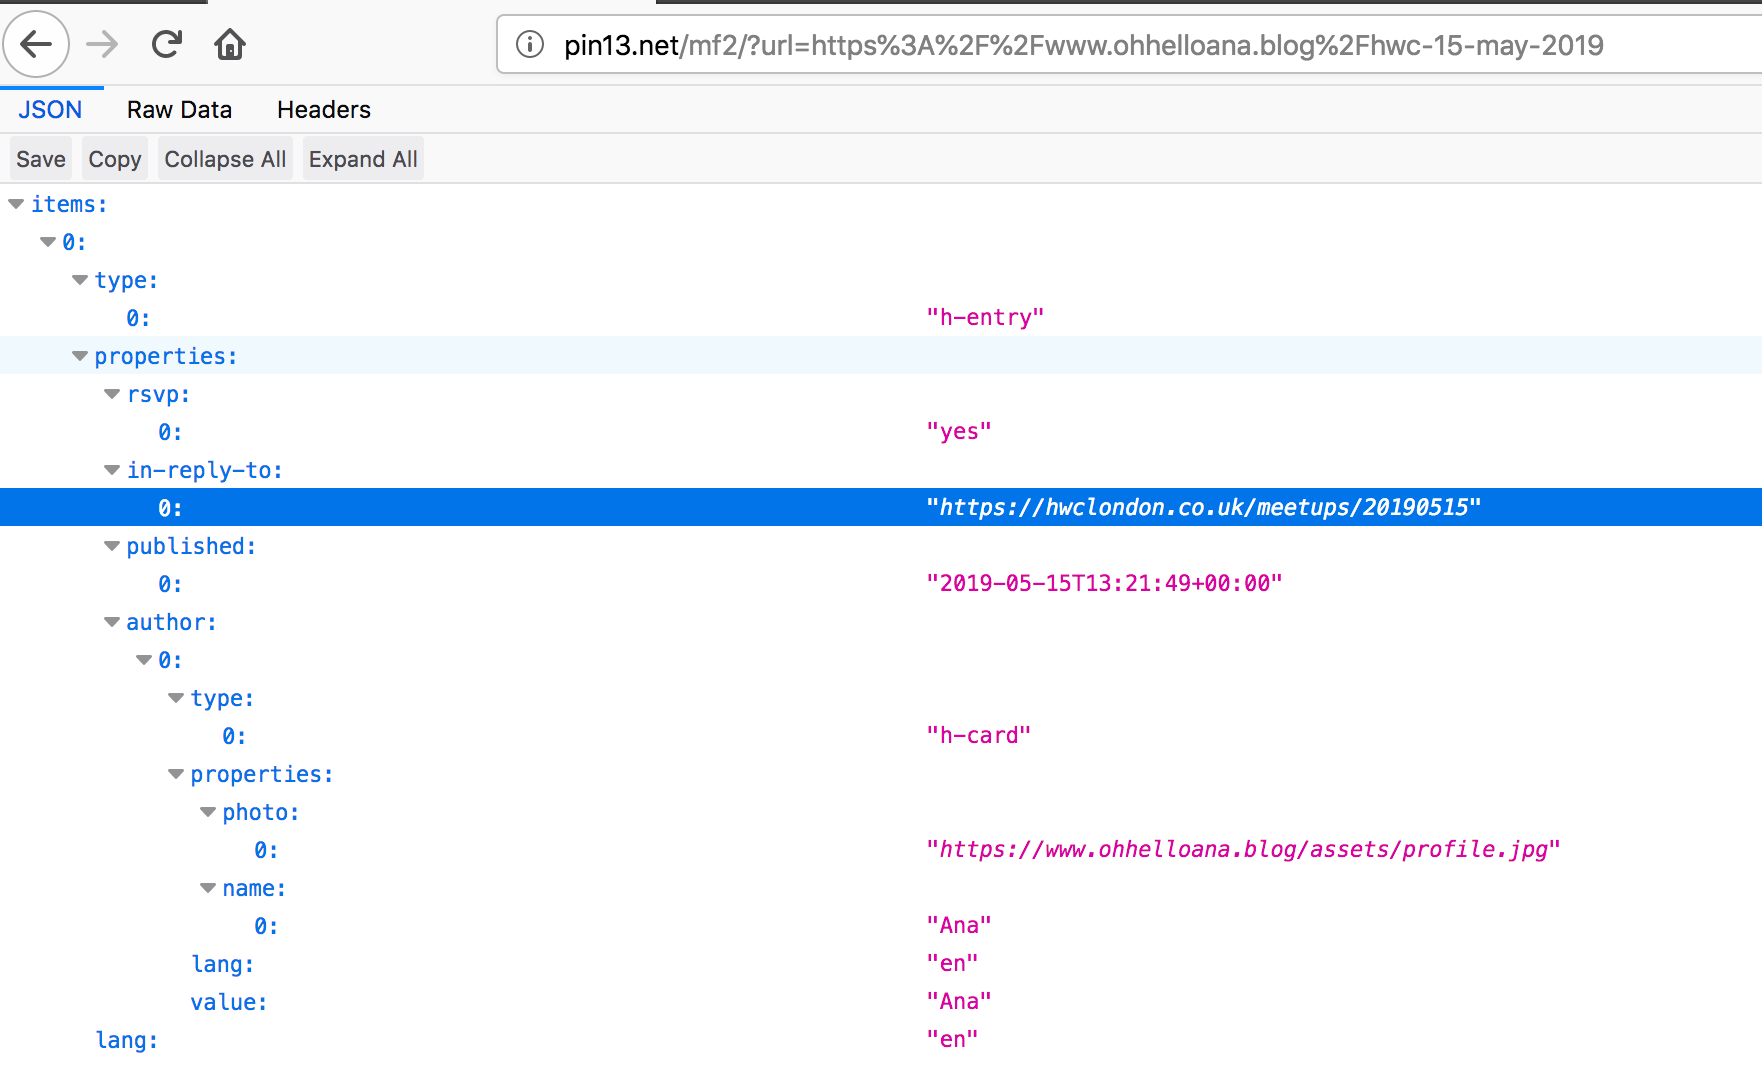
I didn't know how to debug so at the time we used a working example from Calum, pasted the urls and compared both to see what was missing. If you're familar with microformats you will recognise them and how they are used when seeing the whole structure. In my case, what was missing (and it wasn't immediately obvious) was the information if the post was published, quotes around my RSVP answer and author information in the template (with the correct hierarchy).
Another helpful way to see what and if you're missing something is to check the mentions in your target url (this way work best if you submit your Webmention and it isn't appearing like all the others). In this case I used Webmention.io for it and checked everyone else's RSVP content. This method was how we spotted that I was missing the "published" information regarding my post.
Sending a Webmention
Using Telegraph you can send Webmentions. In the "Source URL" I pasted my blog entry with my RSVP and in the "Target URL" I pasted the url of the Homebrew Website Club that I wanted to RSVP to.
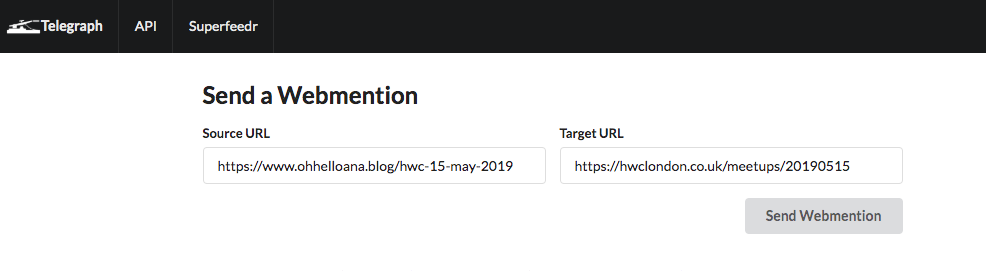
After submitting it, you should see a screen that informs you of the status of it.
Celebration time?
Depending on how frequently your target URL collects Webmentions, and assuming that you saw a success screen after submiting your website, all you have to do is check the target URL. After some attempts mine ended up working! If you want to change anything about it (I changed my photo caption), you would have to submit the webmention again.
Further reading and useful resources:
- IndieWeb's wiki article on RSVP.
- IndieWeb Guides.
- Webmentio.io
- pin13
- Telegraph
- Microformats
- My RSVP post
Thank you to Calum and Neil for all their help and patience with me! Now I need to figure out all the other bits of Webmentions!
April bookmarks
April was an interesting month. This year hasn't been great for me because, for the first time, I really can't control my anxiety. Everything I can't control have been draining me in a way that I never experienced before. Those close to me know I've been struggling a lot daily and it sucks. This month I took nearly two weeks off from work and it made me realise how much anxiety I have on a normal day. While I was on holidays I barely used social media or the news and to no one's surprise, my anxiety went down by a lot. And guess what? I didn't miss out much on tech. Was a new shiny tech thing out? Cool, I will look at it when and if I need it.
Bookmarks from April
Non-tech articles
- I am not always very attached to being alive - by Anna Borges
- EU bans UK's most-used pesticide over health and environment fears - by Damian Carrington
- You may hate metrics. But they’re making journalism better - by Chris Moran
- Attacks by White Extremists Are Growing. So Are Their Connections. - By Weiyi Cai and Simone Landon
- Nordic walking: a pilgrims’ route from Oslo to Trondheim - by Phoebe Smith
- The Gentle Side of Twitch - by Nicole Carpenter
- The Devastating Consequences of Being Poor in the Digital Age - by Mary Madden
- Creative types - by Adobe Create P.S.: mine was "the dreamer"
- My sexual assault case was dropped when I refused to give police my phone - by Anonymous
Tech related content
- Tweet showing how the page load might cost you a lot of money when using roaming abroad - by Harry Roberts
- Trainers. - by Ethan Marcotte
- You probably don't need that hip web framework - by Owen Williams
- A Professional Development Framework for Design - by Andy Thornton
- Some possible career goals - by Julia Evans
- Break out of the echo chamber - by Andy Bell
- Macaroni art simulator - by Neal Agarwal
- Some Unsolicited Blogging Advice - by Dave Rupert
- Improving accessibility with accessibility acceptance criteria - by Paul Hayes
- Twitter without tracking - by Remy Sharp
- Personal Blogs: Don't Call it a comeback! - by Dan Vega
- Auditing My Own Site For Accessibility - by Nic
- Color accessibility: tools and resources to help you design inclusive products - by Stéphanie Walter
- Design Systems - by Figma
- 12 Tips for More Accessible React Apps (Slides, React Finland 2019) - by Manuel Matuzović
- I’m quitting engineering: An exit interview - Olga Dominguez
- April 2019 Weblog: Giving the Web Its Spirit Back - by Jay Hoffmann
- Monthly Digest & Bookmarks — April 2019 - by Johann Schopplich
– Owen WilliamsBut, this has all made me wonder: has the modern stack killed experimentation, and shipping bad ideas? Do weird experiments and fun ideas die on the floor, tangled in complexity, more often now? I'd hazard a guess that the answer is yes, and that you should probably skip that hipster framework—for now—as well. Just ship something instead.
Things that made me smile one way or another
I need to re-think this section. I really see and save a lot of memes per month on Instagram and TikTok. Not sure if all memes are worth sharing but I'd like this to be a "interesting/wholesome" section.
Last week I went to Gem Spa for the magnets and left with an egg cream! Thanks @besteggcream
Mood, doing, thinking, listening
Hands up if you were into MySpace and personal blogs in the mid early 2000s! Well, I was. I was that low-cost emo kid in school that would use HTML and CSS to change their MySpace page (and that hobby is now paying bills so no complaining).
When I read the recent news that MySpace lost all their content I had an old memory coming back at me.
Back then, when I was using MySpace, you were able to set your “mood” - you may be familiar with that feature because Facebook also had (has?) something similar.
I did a little bit of searching and to my surprise, in 2007, someone did a blog post about MySpace moods that you can still read about today (because owning your own content is cool).
Setting your “mood” as a status wasn’t the main memory coming back. It was actually blogs and what teenagers were doing at the time. Back then, in MySpace you could create “notes” which were more or less like blog entries, and if I remember correctly, at the end of the post you would add something like “Mood, doing, listening, thinking”.
I don’t remember the “doing, listening and thinking” being particular form input fields but rather something that you would add optionally (and manually). The “mood” bit would have a specific set of emotions and emoticons to match. So “Mood, doing, thinking, listening” quickly took over and you could see forum threads with people sharing what was on their minds. I remember it being a trend that I picked up on also, but it quickly transferred to personal blogs.
I tried to find living examples of this but it was so hard. I tried different search engines but whenever I typed “Mood, doing, thinking, listening” almost all results were about mental health even if changed the dates around the results. I still had some urls memorised in my head so I used Wayback Machine and I looked up some blogs that I used to read and I found some real examples in the wild but sadly they do not have styling.
While searching for all this and to my rejoice I found a lovely PDF that talks about “Mood” and “Listening” being a common blog feature and I love it!
So because I am feeling nostalgic I’m going to bring “mood, doing, thinking, listening” back to my blog and be alone oversharing in 2019.
Choosing the emojis
I’ve decided to keep it simple and only add to the footer of the blog post this information. Unlike Livejournal, most personal blogs at the time wouldn't have a matching emoticon to their mood. But I want that. I don't have time to convert the old emoticons to svg (i'm not even sure if I could do that from a legal point view). I also remembered that the phpbb forums had a smiley pack available but the last thing I want is to do requests to mini gifs. But in case you're wondering, I did download the emoticons for the memories's sake.
But it is 2019 and emojis are free. Maybe one day when I am an artist I could add my own drawn emoticons to my emotions. But for now emojis will do. Or maybe, one day, when I am as cool as Aaron I will take it to the next level like he did on his website.
How many emotions do I have?
Not that many and while looking up the list of emotions that were available on My Space and Livejournal, I realised that I don't even know the meaning of some of those words. I tried to come up with own list and I can't lie, I struggled to deal with the negative words. I've been trying to tell my self to only share positive things and sometimes that isn't possible. My negative emotions exist but I think I prefer not having too many available and have a bigger variety of positive emotions.
The following match of emotion with emoji was mostly based on how I think my face looks like when I feel those emotions. I do realise that the name of the emotion and what the emoji is supposed to mean may not match.
| Emotion | Emoji |
|---|---|
| Happy | 😃 |
| Accomplished | 💪 |
| Adventurous | 😎 |
| Angry | 😡 |
| Anxious | 😩 |
| Artistic | 🤪 |
| Blank | 😶 |
| Bored | 🙃 |
| Busy | 😓 |
| Calm | 😊 |
| Confident | 😼 |
| Confused | 🤔 |
| Crappy | 💩 |
| Curious | 👀 |
| Disappointed | 😞 |
| Dorky | 🤓 |
| Energetic | 😁 |
| Enlightened | 😲 |
| Exhausted | 😔 |
| Fabulous | 💅🏻 |
| Fascinated | 😍 |
| Hungry | ☹️ |
| Hungover | 😖 |
| Indifferent | 😑 |
| Loved | 😍 |
| Okay | 🙂 |
| Refreshed | 😋 |
| Romantic | 😘 |
| Sad | 😭 |
| Sassy | 😏 |
| Satisfied | 😃 |
| Sleepy | 😴 |
| Thankful | 😊 |
| Warm | 😌 |
Adding these to my blog
This is where I become insecure. I'm sure there's 1000 ways to build the same thing and they are all probably better than the one I've chosen. I don't use any content editor to write for this blog besides writting my own markup. So I didn't implement this by having a drop down that selects the emotion and adds to the post. I could, but I don't have time for that. I'm satisfied with adding it manually.
I searched in GitHub for anything related to Jekyll and Emojis and I did find a couple of things. None of them seem to be exactly what I was looking for (although I could be wrong) but I am not really sure of what I looking for anyway.
To build this I decided to make more use of the Front Matter and include a layout that will render if that information exists.
And that is it. I'm hoping to add more quirks to this blog and I think looking at the past isn't a bad idea. Back then we were far more expressive anyways.
P.S.: Always write and publish when you're happy. I've been having too many bad days in a row and that has stopped me from writing and publishing more. I can't take a nice day for granted. This small and not so important post was written in the end of March.
TIL: Front Matter accepts emojis.