Reading List
The most recent articles from a list of feeds I subscribe to.
sqlite-utils: a nice way to import data into SQLite for analysis
Hello! This is a quick post about a nice tool I found recently called sqlite-utils, from the tools category.
Recently I wanted to do some basic data analysis using data from my Shopify store. So I figured I’d query the Shopify API and import my data into SQLite, and then I could make queries to get the graphs I want.
But this seemed like a lot of boring work, like I’d have to write a
schema and write a Python program. So I hunted around for a solution, and I
found sqlite-utils, a tool designed to make it easy to import arbitrary data
into SQLite to do data analysis on the data.
sqlite-utils automatically generates a schema
The Shopify data has about a billion fields and I really did not want to type
out a schema for it. sqlite-utils solves this problem: if I have an array of
JSON orders, I can create a new SQLite table with that data in it like this:
import sqlite_utils

orders = ... # (some code to get the `orders` array here)

db = sqlite_utils.Database('orders.db')
db['shopify_orders'].insert_all(orders)
you can alter the schema if there are new fields (with alter)
Next, I ran into a problem where on the 5th page of downloads, the JSON contained a new field that I hadn’t seen before.
Luckily, sqlite-utils thought of that: there’s an alter flag which will
update the table’s schema to include the new fields. ```
Here’s what the code for that looks like
db['shopify_orders'].insert_all(orders, alter=True)
you can deduplicate existing rows (with upsert)
Next I ran into a problem where sometimes when doing a sync, I’d download data from the API where some of it was new and some wasn’t.
So I wanted to do an “upsert” where it only created new rows if the item didn’t
already exist. sqlite-utils also thought of this, and there’s an upsert
method.
For this to work you have to specify the primary key. For me that was
pk="id". Here’s what my final code looks like:
db['shopify_orders'].upsert_all(
    orders,
    pk="id",
    alter=True
)
there’s also a command line tool
I’ve talked about using sqlite-utils as a library so far, but there’s also a
command line tool which is really useful.
For example, this inserts the data from a plants.csv into a plants table:
sqlite-utils insert plants.db plants plants.csv --csv
format conversions
I haven’t tried this yet, but here’s a cool example from the help docs of how you can do format conversions, like converting a string to a float:
sqlite-utils insert plants.db plants plants.csv --csv --convert '
return {
  "name": row["name"].upper(),
  "latitude": float(row["latitude"]),
  "longitude": float(row["longitude"]),
}'
This seems really useful for CSVs, where by default it’ll often interpret numeric data as strings if you don’t do this conversions.
metabase seems nice too
Once I had all the data in SQLite, I needed a way to draw graphs with it. I wanted some dashboards, so I ended up using Metabase, an open source business intelligence tool. I found it very straightforward and it seems like a really easy way to turn SQL queries into graphs.
This whole setup (sqlite-utils + metabase + SQL) feels a lot easier to use than my previous setup, where I had a custom Flask website that used plotly and pandas to draw graphs.
that’s all!
I was really delighted by sqlite-utils, it was super easy to use and it did
everything I wanted.
Pages that didn't make it into "How DNS Works"
Hello! A couple weeks ago I released a new zine called How DNS Works.
When I started writing that zine (in, uh, January 2021), I originally had in mind a broader zine on “everything you need to know to own a domain”. So it had a bunch of pages on domain registration, TLS, and email.
At the time I thought “I can just explain DNS in like 5 pages, it’s not that complicated, there will be lots of space for other topics about domains”. I was extremely wrong about that and it turned out I needed all 28 pages to explain DNS. So I ended up deciding to just focus the zine on DNS and all those other topics didn’t make it into the final zine.
This morning it occurred to me that instead of letting all of the old draft pages languish in purgatory on my hard drive, I could post those extra pages here all together on my blog. So here they are!
disclaimer: not super cohesive
I will say (as a disclaimer) that these pages aren’t as cohesive as I usually like my zines to be and they definitely do not tell you everything you need to need to know to own a domain.
domain registration
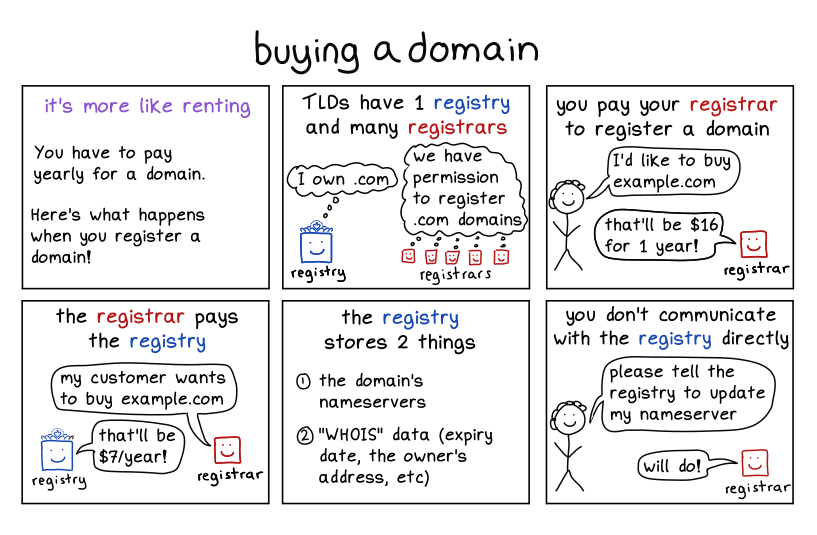
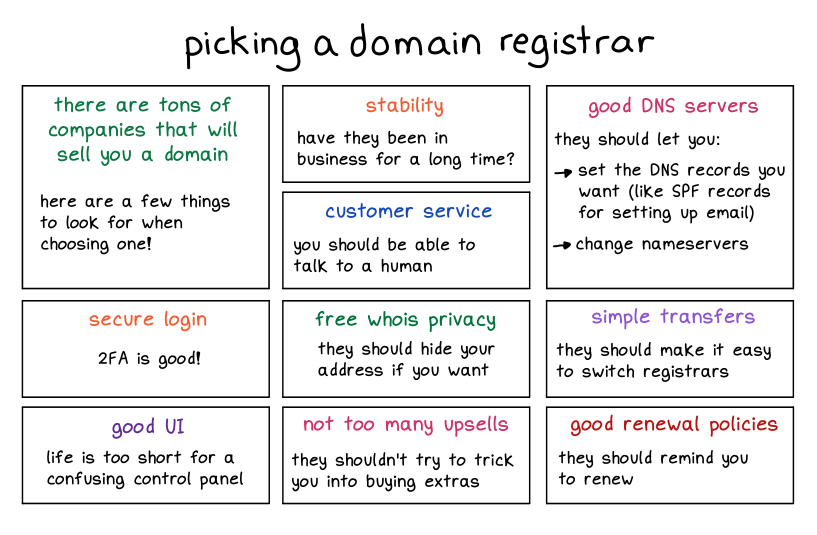

![]()
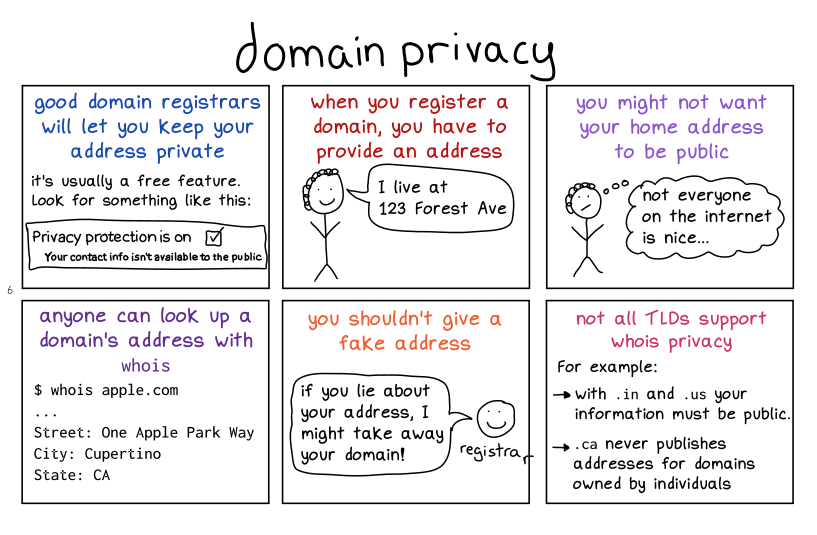
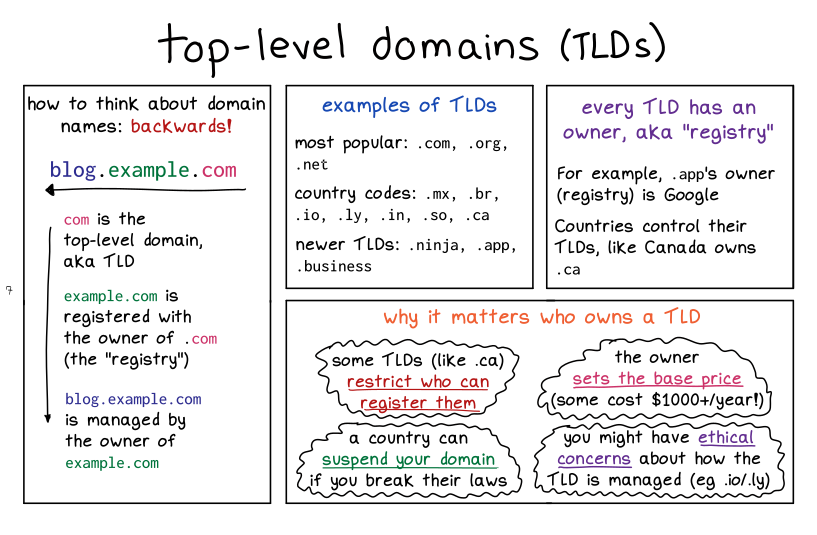
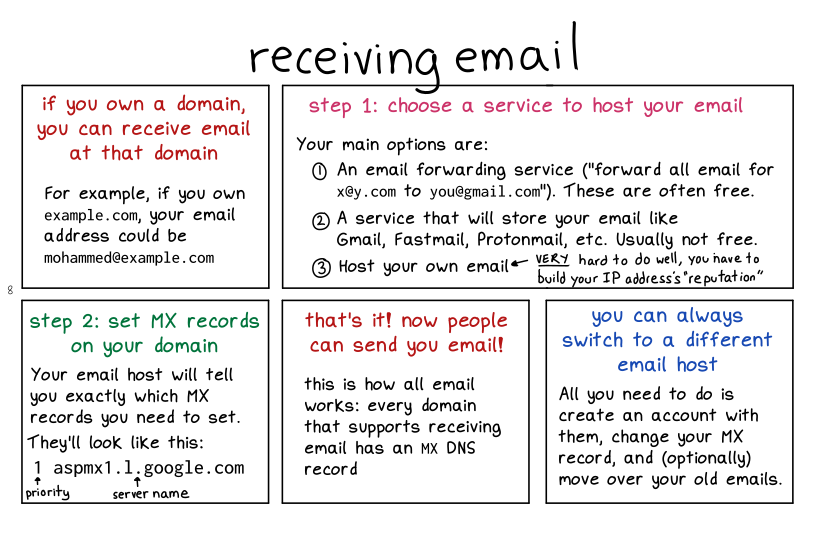
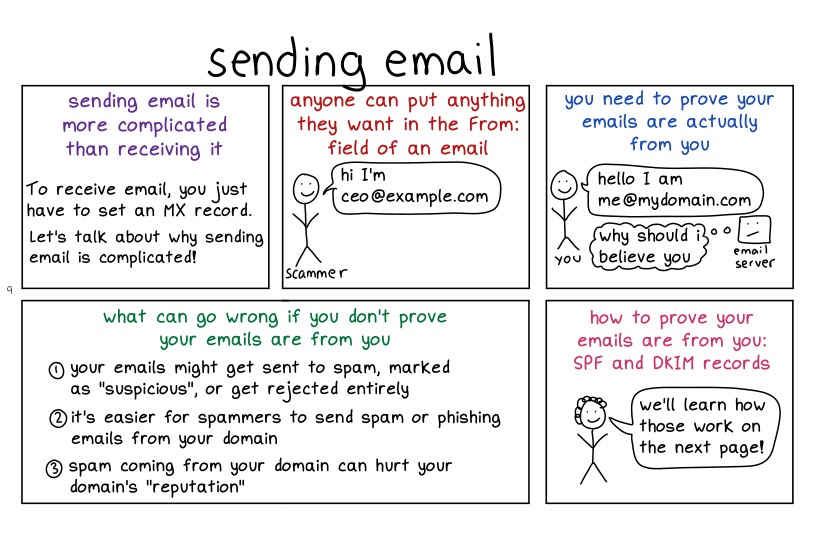
I should say that these 2 pages don’t really do email justice – email security is a HUGE topic that honestly I don’t know a lot about.
TLS
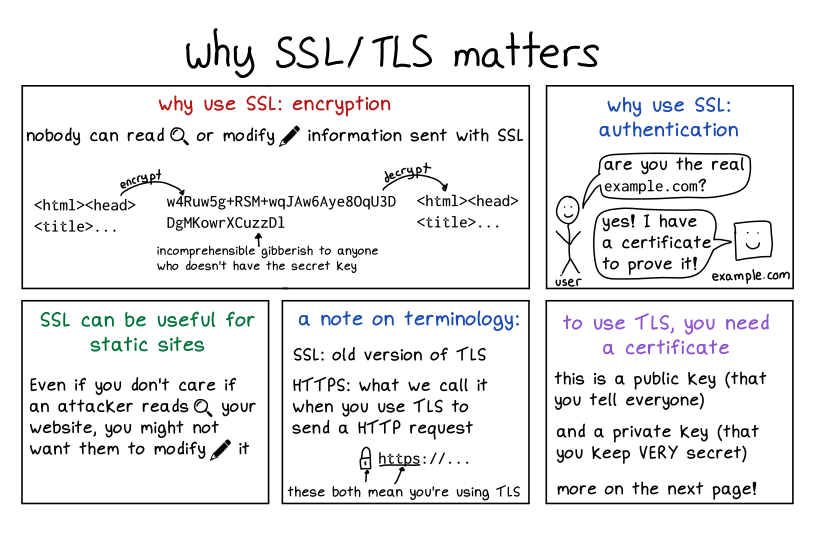
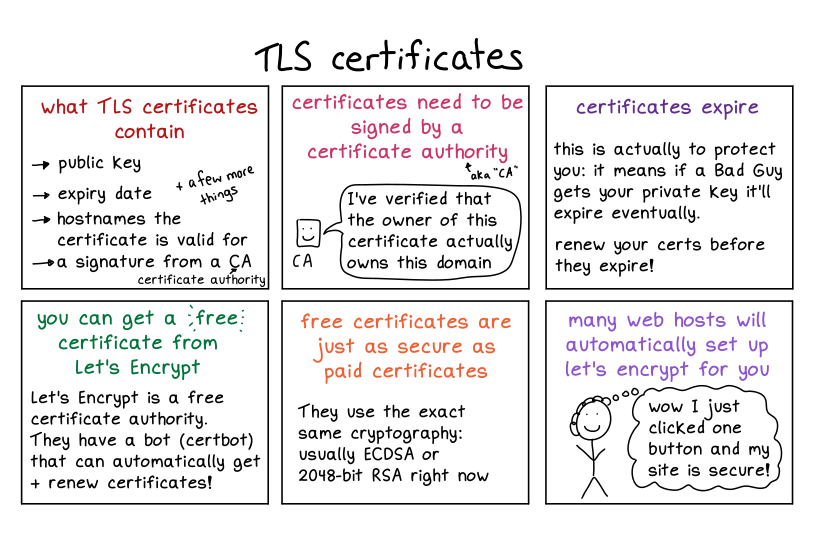
These two pages also don’t remotely cover TLS, it’s possible I’ll write more in depth about TLS at some point. Who knows!
that’s all!
though I will say: if you liked these, you might be interested in buying How DNS Works :)
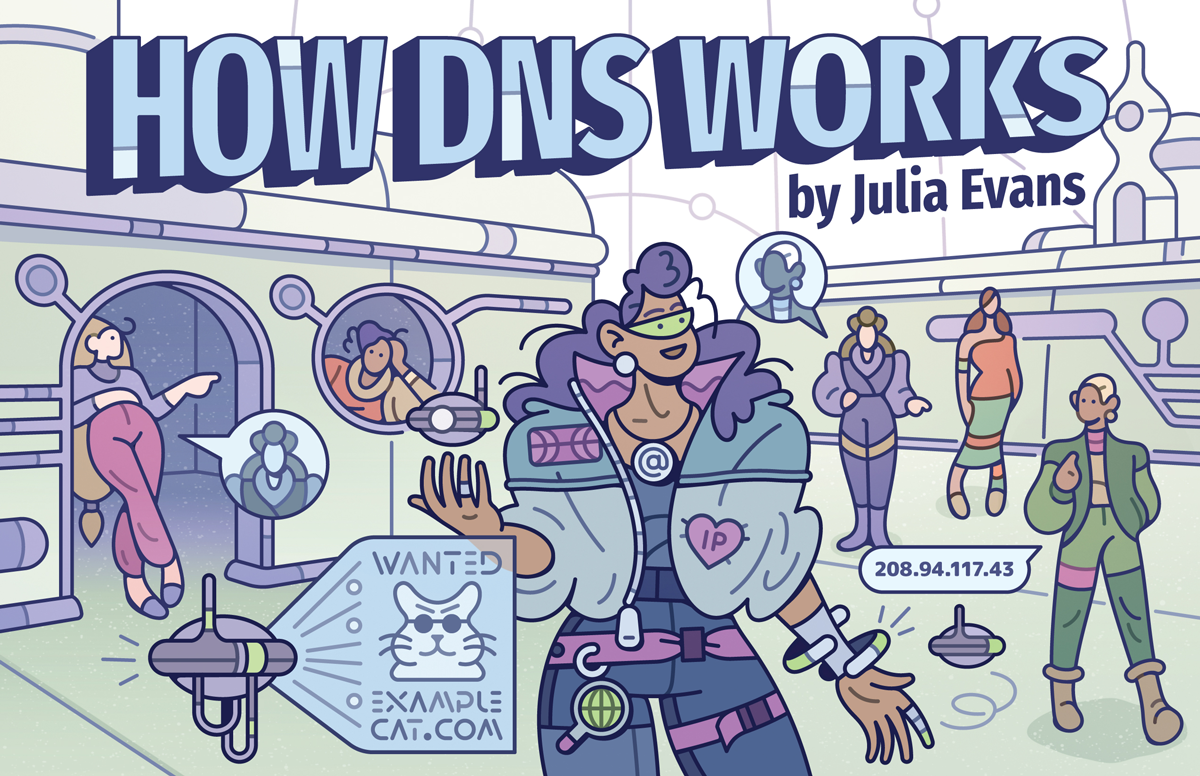
New zine: How DNS Works!
Hello! On Thursday we released a new zine about one of my favourite computer systems: DNS!
You can get it for $12 here: https://wizardzines.com/zines/dns, or get an 11-pack of all my zines here.
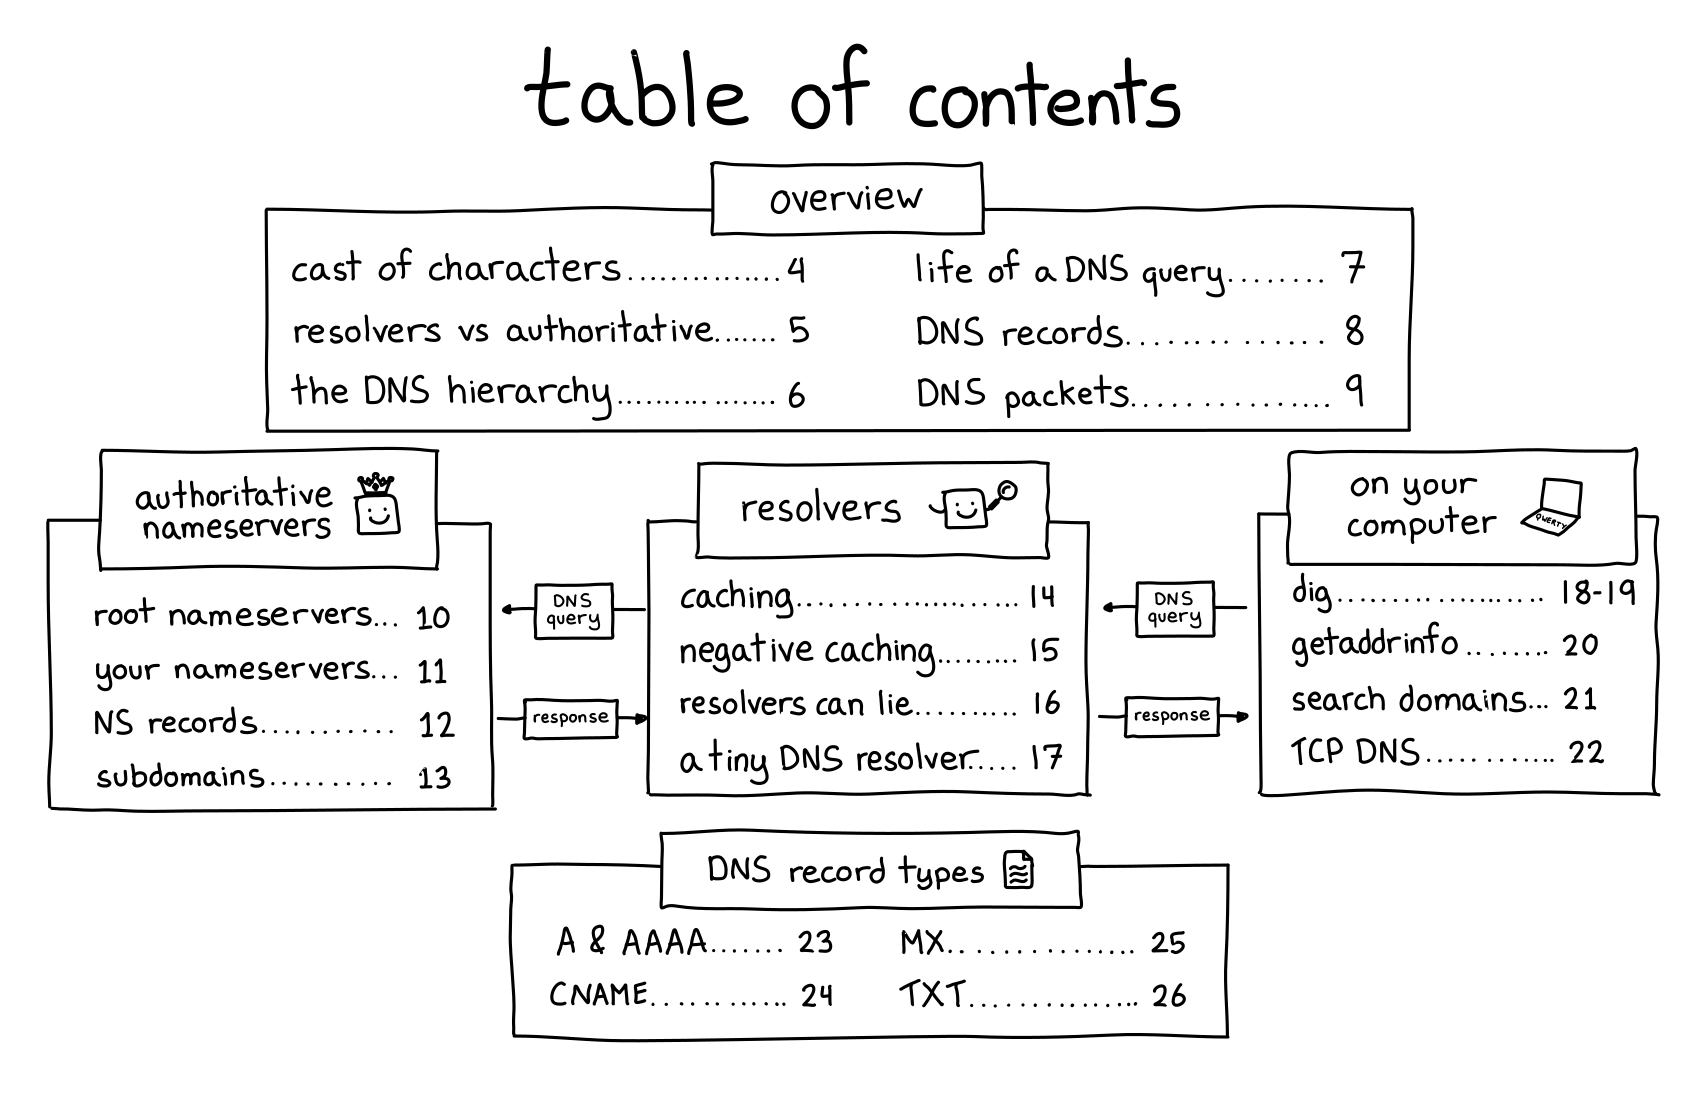
Here’s the cover and table of contents:
why DNS?
I wanted to write about DNS for three reasons:
- DNS is everywhere! You basically can’t use the internet without using DNS — nobody is going to memorize all the IP addresses for every domain they use. You need to look them up with DNS!
- DNS has a really cool decentralized design! I love that it gives you control of your own little corner of the internet (it just costs ~$12/year to own a domain!), I love that the basic design is relatively straightforward, and I love that it’s worked basically the same way for 40 years and scaled relatively well over time
- DNS is very frustrating! I’ve run into some VERY weird DNS problems over the years, and it can feel magical and incomprehensible if you don’t know how it works. But once you learn how DNS works, these problems all become totally possible to understand.
And I’ve never seen a clear explanation of DNS that included all of the technical details I wanted to know, so I decided to write one.
a DNS playground!
I find the most fun way to learn is by experimenting and breaking things! So back in December, Marie and I built a playground where you can do weird DNS experiments with no consequences if you mess something up.
It’s called Mess With DNS. It has examples of experiments you can try, and you’ve very encouraged to come up with your own experiments.
There’s also a blog post from when we released it in December.
a simple DNS lookup tool
I also built a little DNS lookup tool at https://dns-lookup.jvns.ca to provide an easy way to do DNS queries without using the command line. Even though I love the command line I actually find myself using it all the time.
what we left out: DNS security
The main thing that isn’t in the zine is DNS security (DNS over HTTPS, DNS over TLS, DNSSEC). This is because the DNS security landscape still seems to be evolving, and I didn’t feel confident that we could write something that would still be true in 5-10 years.
I think I’ll try to write a blog post about DNS security at some point though.
identifying common points of confusion is amazing
I mentioned earlier that my friend Marie Claire LeBlanc Flanagan and I built Mess With DNS together in December. That was really fun, so Marie and I decided to work together on this zine too – we paired on it for about an hour every weekday for almost 4 months. I’m pretty sure I wouldn’t have finished the zine without her.
She was incredibly helpful with everything to do with the zine (editing! character design! marketing! rewriting the NS records page 5 times!), but one of the biggest things she improved for this zine was feedback.
Usually I only get feedback from maybe 10 beta readers, but this time we wanted to hear from more people and get better at identifying common points of confusion.
We did this by building a small custom feedback website where people could click on a page and leave feedback (“I have a question! This is confusing! I learned something! I have a suggestion! I love this!“).
Building a custom website let us organize the feedback way more easily and hear from more people – in the end we got ~1200 feedback items from ~60 people and all of the feedback made the zine a LOT better.
I might write a longer meta post about all of this later.
some blog posts leading up to this zine
I wrote a bunch of blog posts about DNS over the last year or so while thinking about this zine. Here they all are:
- What happens when you update your DNS?
- A little tool to make DNS queries
- A tool to spy on your DNS queries: dnspeep
- How do you tell if a problem is caused by DNS?
- DNS “propagation” is actually caches expiring
- Why might you run your own DNS server?
- Some ways DNS can break
- A toy DNS resolver
- The multiple meanings of “nameserver” and “DNS resolver”
you can get a print copy shipped to you!
There’s always been the option to print the zines yourself on your home printer.
But this time there’s a new option too: you can get a print copy shipped to you! (just click on the “print version” link on this page)
The only caveat is that the international shipping costs are unreasonably high, so if you’re outside the US it probably doesn’t make sense to get just 1 zine shipped to you. I’m still trying to find a workaround for that. Orders of $60+ do include free international shipping though.
Here’s the link to get the zine again: https://wizardzines.com/zines/dns/
thank you
If you’ve bought zines in the past, thanks so much for all your support over the years. None of this would be possible without you.
A list of new(ish) command line tools
Hello! Today I asked on twitter about newer
command line tools, like ripgrep and fd and fzf and exa and bat.
I got a bunch of replies with tools I hadn’t heard of, so I thought I’d make a list here. A lot of people also pointed at the modern-unix list.
replacements for standard tools
- ripgrep, ag, ack (grep)
- exa, lsd (ls)
- mosh (ssh)
- bat (cat)
- delta (a pager for git)
- fd (find)
- drill, dog (dig)
- duf (df)
- dust, ncdu (du)
- pgcli (psql)
- btm, btop, glances, gtop, zenith (top)
- tldr (man, sort of)
- sd (sed)
- difftastic (diff)
- mtr (traceroute)
- plocate (locate)
- xxd, hexyl (hexdump)
new inventions
Here are some tools that are not exactly replacements for standard tools:
- z, fasd, autojump, zoxide (tools to make it easier to find files / change directories)
- broot, nnn, ranger (file manager)
- direnv (load environment variables depending on the current directory)
- fzf, peco (“fuzzy finder”)
- croc and magic-wormhole (send files from one computer to another)
- hyperfine (benchmarking)
- httpie, curlie, xh (for making HTTP requests)
- entr (run arbitrary commands when files change)
- asdf (version manager for multiple languages)
- tig, lazygit (interactive interfaces for git)
- lazydocker (interactive interface for docker)
- choose (the basics of awk/cut)
- ctop (top for containers)
- fuck (autocorrect command line errors)
- tmate (share your terminal with a friend)
- lnav, angle-grinder (tools for managing logs)
- mdp, glow (ways to display markdown in the terminal)
- pbcopy/pbpaste (for clipboard <> stdin/stdout) maybe aren’t “new” but were mentioned a lot. You can use xclip to do the same thing on Linux.
JSON/YAML/CSV things:
- jq (a great JSON-wrangling tool)
- jc (convert various tools’ output into JSON)
- jo (create JSON objects)
- yq (like
jq, but for YAML). there’s also another yq - fq (like
jq, but for binary) - htmlq (like
jq, but for HTML) - fx (interactive json tool)
- jless (json pager)
- xsv (a command line tool for csv files, from burntsushi)
- visidata (“an interactive multitool for tabular data”)
- miller (“like awk/sed/cut/join/sort for CSV/TSV/JSON/JSON lines”)
grep things:
- pdfgrep (grep for PDF)
- gron (make JSON greppable)
- ripgrep-all (ripgrep, but also PDF, zip, ebooks, etc)
less-new tools
Here are a few of not-so-new tools folks mentioned aren’t that well known:
- pv (“pipe viewer”, gives you a progress bar for a pipe)
- vidir (from moreutils, lets you batch rename/delete files in vim)
- sponge, ts, parallel (also from moreutils)
some of my favourites
My favourites of these that I use already are entr, ripgrep, git-delta,
httpie, plocate, and jq.
I’m interested in trying out direnv, btm, z, xsv, and duf, but I
think the most exciting tool I learned about is vidir.
Implementing a toy version of TLS 1.3
Hello! Recently I’ve been thinking about how I find it fun to learn computer networking by implementing working versions of real network protocols.
And it made me wonder – I’ve implemented toy versions of traceroute, TCP and DNS. What about TLS? Could I implement a toy version of that to learn more about how it works?
I asked on Twitter if this would be hard, got some encouragement and pointers for where to start, so I decided to go for it.
This was really fun and I learned a little more about how involved real cryptography is – thanks to cryptopals, I already 100% believed that I should not invent my own crypto implementations, and seeing how the crypto in TLS 1.3 works gave me even more of an appreciation for why I shouldn’t :)
As a warning: I am really not a cryptography person, I will probably say some incorrect things about cryptography in this post and I absolutely do not know the history of past TLS vulnerabilities that informed TLS 1.3’s design.
All of that said, let’s go implement some cryptography! All of my hacky code is on github. I decided to use Go because I heard that Go has good crypto libraries.
the simplifications
I only wanted to work on this for a few days at most, so I needed to make some pretty dramatic simplifications to make it possible to get it done quickly.
I decided my goal was going to be to download this blog’s homepage with TLS. So I don’t need to implement a fully general TLS implementation, I just need to successfully connect to one website.
Specifically, this means that:
- I only support one cipher suite
- I don’t verify the server’s certificate at all, I just ignore it
- my parsing and message formatting can be extremely janky and fragile because I only need to be able to talk to one specific TLS implementation (and believe me, they are)
an amazing TLS resource: tls13.ulfheim.net
Luckily, before starting this I remembered vaguely that I’d seen a website that explained every single byte in a TLS 1.3 connection, with detailed code examples to reproduce every part. Some googling revealed that it was The New Illustrated TLS Connection.
I can’t stress enough how helpful this was, I looked at probably more than a hundred times and I only looked at the TLS 1.3 RFC for a few small things.
some cryptography basics
Before I started working on this, my understanding of TLS was:
- at the beginning there’s some sort of Diffie-Hellman key exchange
- you use the key exchange to somehow (how???) get an AES symmetric key and encrypt the rest of the connection with AES
This was sort of right, but it turns out it’s more complicated than that.
Okay, let’s get into my hacky toy TLS implementation. It hopefully goes without saying that you should absolutely not use this code for anything.
step 1: say hello
First we need to send a “Client Hello” message. For my purposes this has just 4 pieces of information in it:
- A randomly generated public key
- 32 bytes of random data (the “Client Random”)
- The domain name I want to connect to (
jvns.ca) - The cipher suites/signature algorithms we want to use (which I just copied from tls.ulfheim.net). This negotiation process is pretty important in general but I’m ignoring it because I only support one signature algorithm / cipher suite.
The most interesting part of this to me was part 1 – how do I generate the public key?
I was confused about this for a while but it ended up being just 2 lines of code.
privateKey := random(32)
publicKey, err := curve25519.X25519(privateKey, curve25519.Basepoint)
You can see the rest of the code to generate the client hello message here but it’s very boring, it’s just a lot of bit fiddling.
elliptic curve cryptography is cool
I am not going to give an explanation of elliptic curve cryptography here, but I just want to say how point out how cool it is that you can:
- generate a random 32-byte string as a private key
- “multiply” the private key by the curve’s base point to get the public key (this is elliptic curve “multiplication”, where
n * Pmeans “add P to itself n times”) - that’s it!!
I wrote “multiply” in scare quotes because this “multiplication” doesn’t let you multiply points on the elliptic curve by each other. You can only multiply a point by an integer.
Here’s the function signature of the X25519 function we use to do the
“multiplication”. You can see one of the arguments is called scalar and one
is called point. And the order of the arguments matters! If you switch them it
won’t do the right thing.
func X25519(scalar, point []byte) ([]byte, error)
I am not going to say more about elliptic curve cryptography here but I love how simple this is to use – it seems a lot straightforward than RSA where your private keys have to be prime numbers.
I don’t know if “you can use any 32-byte string as a private key” is true for all elliptic curves or just for this specific elliptic curve (Curve25519).
step 2: parse the server hello
Next the server says hello. This is very boring, basically we just need to parse it to get the server’s public key which is 32 bytes. Here’s the code though.
step 3: calculate the keys to encrypt the handshake
Now that we have the server’s public key and we’ve sent the server our public key, we can start to calculate the keys we’re going to use to actually encrypt data.
I was surprised to learn that there are at least 4 different symmetric keys involved in TLS:
- client handshake key/iv (for the data the client sends in the handshake)
- server handshake key/iv (for the data the server sends in the handshaek)
- client application key/iv (for the rest of the data the client sends)
- server application key/iv (for the rest of the data the server sends)
- I think also another key for session resumption, but I didn’t implement that
We start out by combining the server’s public key and our private key to get a shared secret. This is called “elliptic curve diffie hellman” or ECDH and it’s pretty simple: “multiply” the server’s private key by our public key:
sharedSecret, err := curve25519.X25519(session.Keys.Private, session.ServerHello.PublicKey)
This gives us a 32-byte secret key that both the client and the server has. Yay!
But we need 96 bytes (16 + 12) * 4 of keys in total. That’s more than 32 bytes!
time for key derivation
Apparently the way you turn a small key into more keys is called “key derivation”, and TLS 1.3 uses an algorithm called “HKDF” to do this. I honestly do not understand this but here is what my code to do it looks like.
It seems to involve alternately calling hkdf.Expand and hkdf.Extract over and
over again a bunch of times.
func (session *Session) MakeHandshakeKeys() {
	zeros := make([]byte, 32)
	psk := make([]byte, 32)
	// ok so far
	if err != nil {
		panic(err)
	}
	earlySecret := hkdf.Extract(sha256.New, psk, zeros) // TODO: psk might be wrong
	derivedSecret := deriveSecret(earlySecret, "derived", []byte{})
	session.Keys.HandshakeSecret = hkdf.Extract(sha256.New, sharedSecret, derivedSecret)
	handshakeMessages := concatenate(session.Messages.ClientHello.Contents(), session.Messages.ServerHello.Contents())

	cHsSecret := deriveSecret(session.Keys.HandshakeSecret, "c hs traffic", handshakeMessages)
	session.Keys.ClientHandshakeSecret = cHsSecret
	session.Keys.ClientHandshakeKey = hkdfExpandLabel(cHsSecret, "key", []byte{}, 16)
	session.Keys.ClientHandshakeIV = hkdfExpandLabel(cHsSecret, "iv", []byte{}, 12)

	sHsSecret := deriveSecret(session.Keys.HandshakeSecret, "s hs traffic", handshakeMessages)
	session.Keys.ServerHandshakeKey = hkdfExpandLabel(sHsSecret, "key", []byte{}, 16)
	session.Keys.ServerHandshakeIV = hkdfExpandLabel(sHsSecret, "iv", []byte{}, 12)
}
This was pretty annoying to get working because I kept passing the wrong arguments to things. The only reason I managed it was because https://tls13.ulfheim.net provided a bunch of example inputs and outputs and example code so I was able to write some unit tests and check my code against the site’s example implementation.
Anyway, eventually I got all my keys calculated and it was time to start decrypting!
an aside on IVs
For each key there’s also an “IV” which stands for “initialization vector”. The idea seems to be to use a different initialization vector for every message we encrypt/decrypt, for More Security ™.
In this implementation the way we get a different IV for each message is by xoring the IV with the number of messages sent/received so far.
step 4: write some decryption code
Now that we have all these keys and IVs, we can write a decrypt function.
I thought that TLS just used AES, but apparently it uses something called “authentication encryption” on top of AES that I hadn’t heard of before.
The wikipedia article explanation of authenticated encryption is actually pretty clear:
… authenticated encryption can provide security against chosen ciphertext attack. In these attacks, an adversary attempts to gain an advantage against a cryptosystem (e.g., information about the secret decryption key) by submitting carefully chosen ciphertexts to some “decryption oracle” and analyzing the decrypted results. Authenticated encryption schemes can recognize improperly-constructed ciphertexts and refuse to decrypt them. This, in turn, prevents the attacker from requesting the decryption of any ciphertext unless it was generated correctly using the encryption algorithm
This makes sense to me because I did some of the cryptopals challenges and there’s an attack a bit like this in cryptopals set 2 (I don’t know if it’s the exact same thing).
Anyway, here’s some code that uses authenticated encryption the way the TLS 1.3 spec says it should. I think GCM is an authenticated encryption algorithm.
func decrypt(key, iv, wrapper []byte) []byte {

	block, err := aes.NewCipher(key)
	if err != nil {
		panic(err.Error())
	}

	aesgcm, err := cipher.NewGCM(block)
	if err != nil {
		panic(err.Error())
	}

	additional := wrapper[:5]
	ciphertext := wrapper[5:]

	plaintext, err := aesgcm.Open(nil, iv, ciphertext, additional)
	if err != nil {
		panic(err.Error())
	}
	return plaintext
}
step 5: decrypt the server handshake
Next the server sends some more handshake data. This contains the certificate and some other stuff.
Here’s my code for decrypting the handshake. Basically it just reads the encrypted data from the network, decrypts it, and saves it.
record := readRecord(session.Conn)
if record.Type() != 0x17 {
    panic("expected wrapper")
}
session.Messages.ServerHandshake = decrypt(session.Keys.ServerHandshakeKey, session.Keys.ServerHandshakeIV, record)
You might notice that we don’t actually parse this data at all – that’s because we don’t need the contents, since we’re not verifying the server’s certificate.
I was surprised that you don’t technically need to look at the server’s certificate at all to make a TLS connection (though obviously you should verify it!). I thought you would need to at least parse it to get a key out of it or something.
We do need to be able to hash the handshake for the next step though, so we have to store it.
step 6: derive more keys
We use a hash of the SHA256 handshake data we just got from the server to generate even more symmetric keys. This is almost the last step!
This is almost exactly the same as the key derivation code from before, but I’m including it because I was surprised by how much work needed to be done to generate all these keys.
func (session *Session) MakeApplicationKeys() {
    handshakeMessages := concatenate(
        session.Messages.ClientHello.Contents(),
        session.Messages.ServerHello.Contents(),
        session.Messages.ServerHandshake.Contents())

    zeros := make([]byte, 32)
    derivedSecret := deriveSecret(session.Keys.HandshakeSecret, "derived", []byte{})
    masterSecret := hkdf.Extract(sha256.New, zeros, derivedSecret)

    cApSecret := deriveSecret(masterSecret, "c ap traffic", handshakeMessages)
    session.Keys.ClientApplicationKey = hkdfExpandLabel(cApSecret, "key", []byte{}, 16)
    session.Keys.ClientApplicationIV = hkdfExpandLabel(cApSecret, "iv", []byte{}, 12)

    sApSecret := deriveSecret(masterSecret, "s ap traffic", handshakeMessages)
    session.Keys.ServerApplicationKey = hkdfExpandLabel(sApSecret, "key", []byte{}, 16)
    session.Keys.ServerApplicationIV = hkdfExpandLabel(sApSecret, "iv", []byte{}, 12)
}
step 7: finish the handshake
Next we need to send a “handshake finished” message to the server to verify that everything is done. That code is here.
And now we’re done the handshake! That was the hard part, sending and receiving the data is relatively easy.
step 8: make a HTTP request
I wrote a SendData function that encrypts and sends data using our keys. This time we’re using the “application” keys and not the handshake keys. This made making a HTTP request pretty simple:
req := fmt.Sprintf("GET / HTTP/1.1\r\nHost: %s\r\n\r\n", domain)
session.SendData([]byte(req))
step 9: we can actually decrypt the response!!!
Now comes the moment I’d been waiting for — actually decrypting the response from the server!!! But here I needed to learn something else about TLS.
TLS data comes in blocks
I previously thought that once you established the connection, encrypted TLS data was just a stream. But that’s not how it works – instead, it’s transmitted in blocks. Like, you’ll get a chunk of ~1400 bytes to decrypt, and then another chunk, and then another chunk.
I’m not sure why the blocks have the size they do (maybe it’s so that each one will fit inside a TCP packet ???), but in theory I think they could be up to 65535 bytes, since their size field is 2 bytes. The blocks I got were all 1386 bytes each.
Every time we get a block, we have to:
- calculate a new IV as
old_iv xor num_records_received - decrypt it using the key and the new IV
- increment the count of records received
Here’s what the ReceiveData() function I wrote looks like.
The most interesting part of this is the iv[11] ^= session.RecordsReceived –
that’s the part that adjusts the IV for each block.
func (session *Session) ReceiveData() []byte {
	record := readRecord(session.Conn)
	iv := make([]byte, 12)
	copy(iv, session.Keys.ServerApplicationIV)
	iv[11] ^= session.RecordsReceived
	plaintext := decrypt(session.Keys.ServerApplicationKey, iv, record)
	session.RecordsReceived += 1
	return plaintext
}
This iv[11] thing assumes that there are less than 255 blocks which obviously
is not true in general in TLS, but I was lazy and to download my blog’s
homepage I only needed 82 blocks.
We actually have to do this when we send data too, but I didn’t implement it because we only sent 1 packet.
problem: getting the whole block of tLS data
I ran into one problem with TCP where sometimes I’d try to read a block of TLS data (~1386 bytes), but I wouldn’t get the whole thing. I guess the TLS blocks can be split up across multiple TCP packets.
I fixed this in a really dumb way, by just polling the TCP connection in a loop until it gave me the data I wanted. Here’s my code to do that:
func read(length int, reader io.Reader) []byte {
	var buf []byte
	for len(buf) != length {
		buf = append(buf, readUpto(length-len(buf), reader)...)
	}
	return buf
}
I assume a real TLS implementation would use a thread pool or coroutines or something to manage this.
step 10: knowing when we’re done
When the HTTP response is done, we get these bytes: []byte{48, 13, 10, 13, 10, 23}.
This seems to be because my HTTP server is using chunked transfer encoding, so
there’s no Content-Length header and I need to watch for those bytes at the
end instead.
So here’s the code to receive the HTTP response. Basically we just loop until we see those bytes, then we stop.
func (session *Session) ReceiveHTTPResponse() []byte {
	var response []byte
	for {
		pt := session.ReceiveData()
		if string(pt) == string([]byte{48, 13, 10, 13, 10, 23}) {
			break
		}
		response = append(response, pt...)
	}
	return response
}
that’s it!
Finally, I ran the program and I downloaded my blog’s homepage! It worked! Here’s what the results look like:
$ go build; ./tiny-tls
HTTP/1.1 200 OK
Date: Wed, 23 Mar 2022 19:37:47 GMT
Content-Type: text/html
Transfer-Encoding: chunked
Connection: keep-alive
... lots more headers and HTML follow...
Okay, the results are kind of anticlimactic, it’s just the same as what you’d
see if you ran curl -i https://jvns.ca except with no formatting. But I was
extremely excited when I saw it.
unit tests are great
Every time I write networking code like this, I forget that unit testing is good, and I thrash around with a bunch of parsing / formatting code that does not work and just getting NOPE messages back from the server on the other end.
And then I remember unit tests. In this case, I copied a bunch of the data from the https://tls13.ulfheim.net example and put it into my unit tests so that I could quickly make sure that my parsing and crypto were working correctly. It made everything about 10 times easier and faster.
some things I learned
This was really fun! I learned that
- elliptic curve diffie-hellman is very cool, and at least with Curve25519 you can use literally any 32-byte string as a private key
- there are a LOT of different symmetric keys involved in TLS and the key derivation process is pretty complicated
- TLS uses AES with some extra “authenticated encryption” algorithms on top
- TLS data is sent/received as a bunch of blocks, not as a stream
My code truly is terrible, it can connect to my site (jvns.ca) and I think literally no other sites.
I won’t pretend to understand all the reasons TLS is designed this way, but it was a fun way to spend a couple of days, I feel a little more informed, and I think it’ll be easier for me to understand things I read about TLS in the future.
a plug for cryptopals
If you want to learn about cryptography and you haven’t tried the cryptopals challenges, I really recommend them – you get to implement a lot of attacks on crypto systems and it’s very fun.