Reading List
The most recent articles from a list of feeds I subscribe to.
New talk: Learning DNS in 10 years
Here’s a keynote I gave at RubyConf Mini last year: Learning DNS in 10 years. It’s about strategies I use to learn hard things. I just noticed that they’d released the video the other day, so I’m just posting it now even though I gave the talk 6 months ago.
Here’s the video, as well as the slides and a transcript of (roughly) what I said in the talk.
the video
the transcript


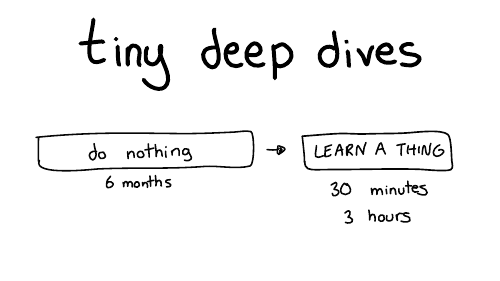
So, we're going to talk about learning through a series of tiny deep dives. My favorite way of learning things is to do nothing, most of the time.
That's why it takes 10 years.
So for six months I'll do nothing and then like I'll furiously learn something for maybe 30 minutes or three hours or an afternoon. And then I'll declare success and go back to doing nothing for months. I find this works really well for me.
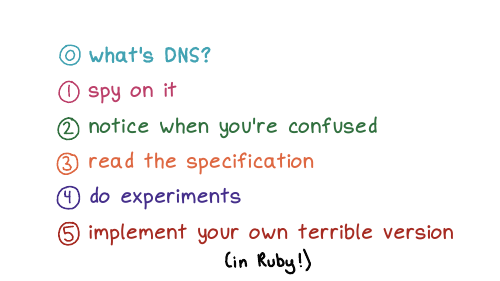
Here are some of the strategies we're going to talk about for doing these tiny deep dives
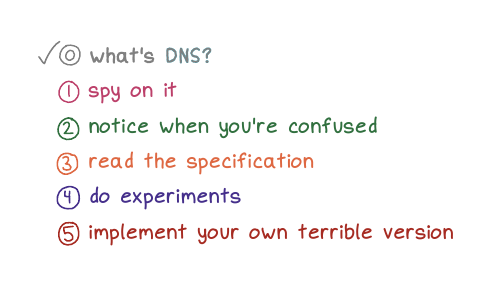
First, we're going to start briefly by talking about what DNS is.
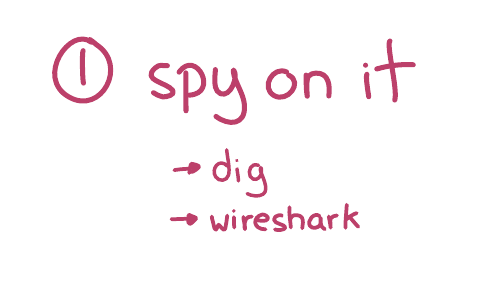
Next, we're going to talk about spying on DNS.
Then we're gonna talk about being confused, which is my main mode. (I'm always confused about something!)
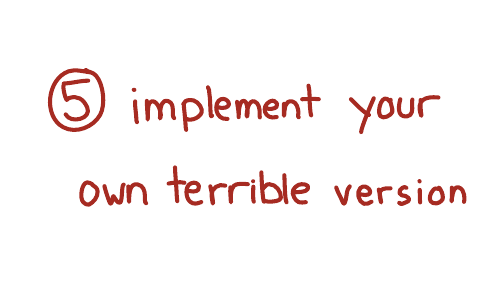
Then we'll talk about reading the specification, we'll going to do some experiments, and we're going to implement our own terrible version of DNS.
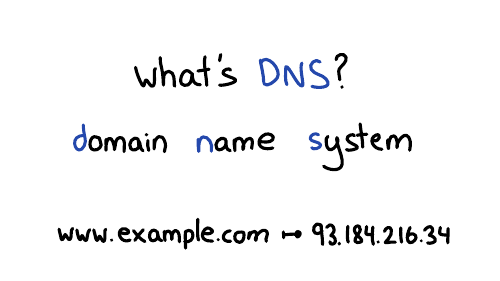
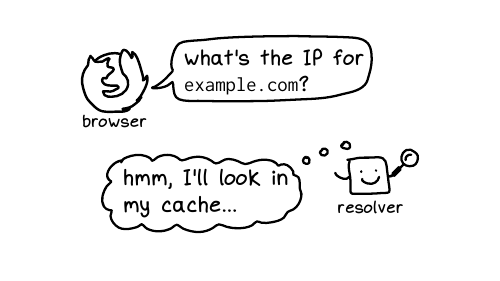
www.example.com, your browser
needs to look up that website's IP address. So DNS translates
domain names into IP addresses. It looks up other information about domain
names too, but we're mostly just going to talk about IP addresses today.

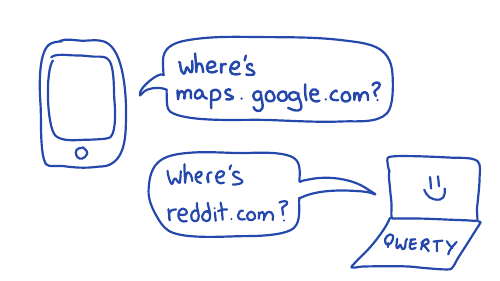
For example, you're on your phone, you're using Google Maps, it needs to know, where is maps.google.com, right? Or on your computer, where's reddit.com? What's the IP address? And if we didn't have DNS, the entire internet would collapse.
I think it's fun to learn how this behind the scenes stuff works.
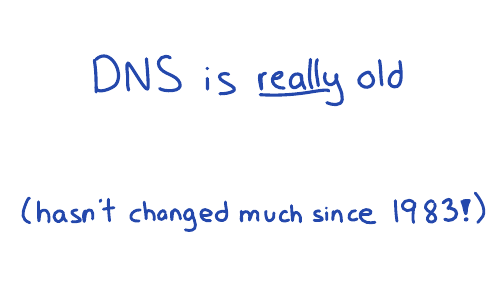
The other thing about DNS I find interesting is that it's really old. There's this document (RFC 1035) which defines how DNS works, that was written in 1987. And if you take that document and you write a program that works the way that documents says to work, your program will work. And I think that's kind of wild, right?
The basics haven't changed since before I was born. So if you're a little slow about learning about it, that's ok: it's not going to change out from under you.
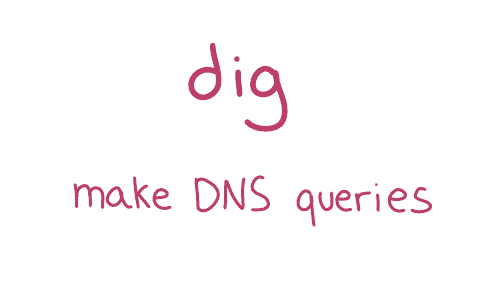
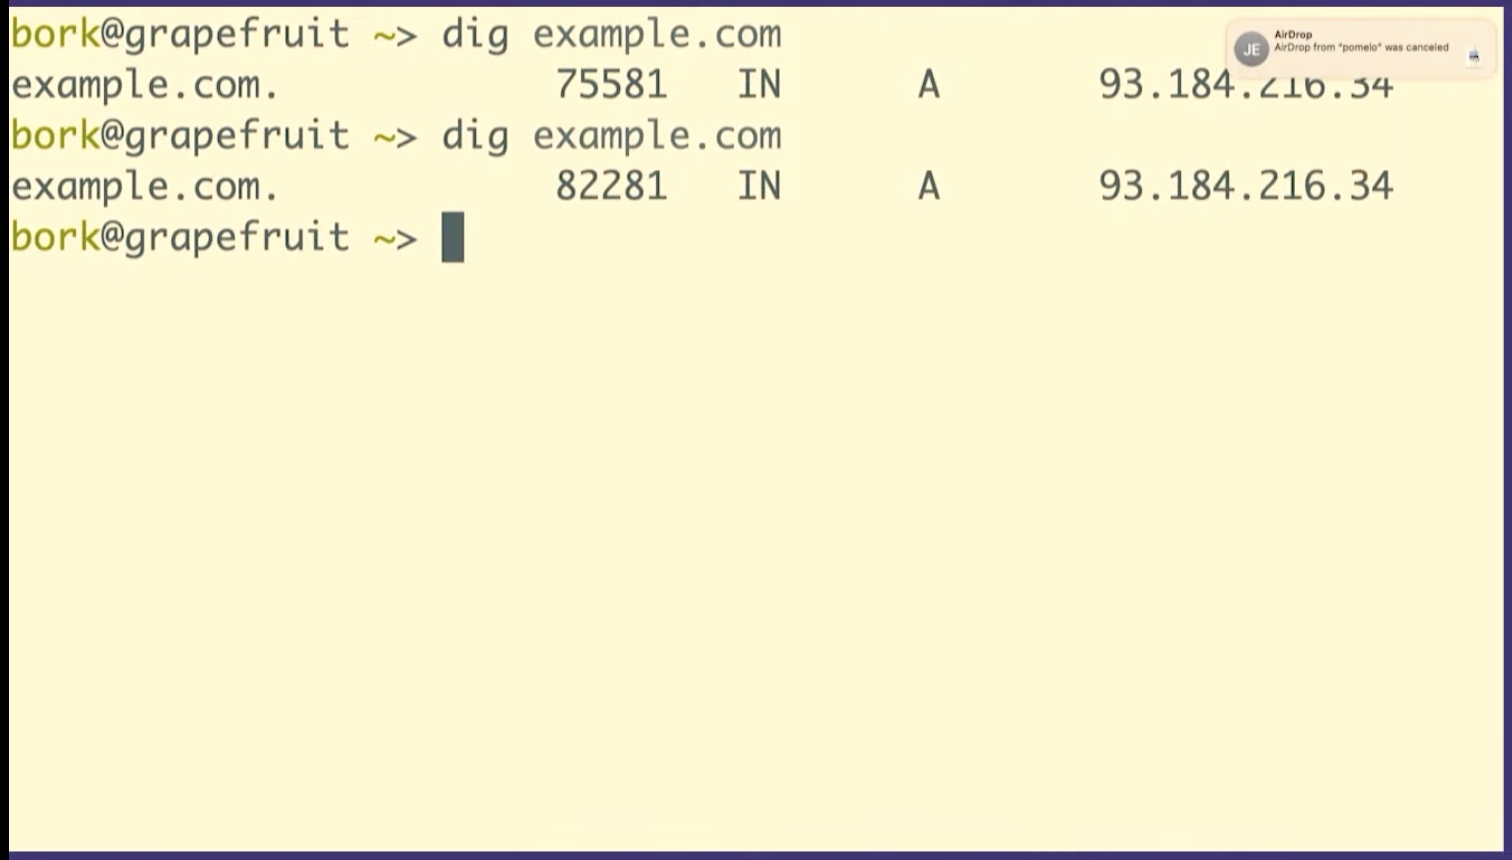
maps.google.com. We
can do that in dig!

dig maps.google.com, it prints out 5 fields. Let's
talk about what those 5 fields are.
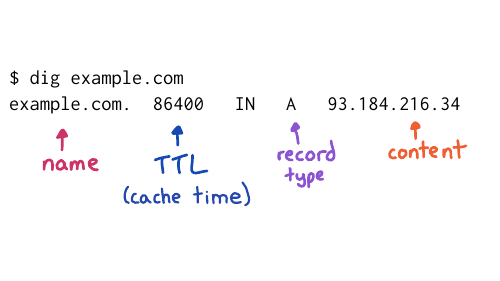
I've used example.com instead of maps.google.com on this slide, but the fields are the same. Let's talk about 4 of them:
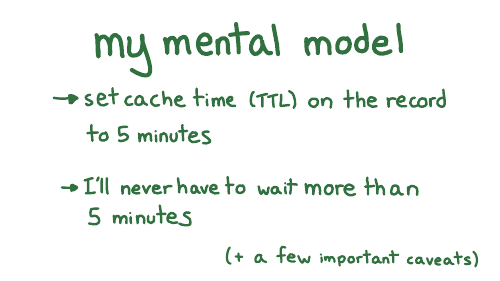
We have the domain name, no big deal
The Time To Live, which is how long to cache that record for so this is a one day
You have the record type, A stands for address because this is an IP address
And you have the content, which is the IP address

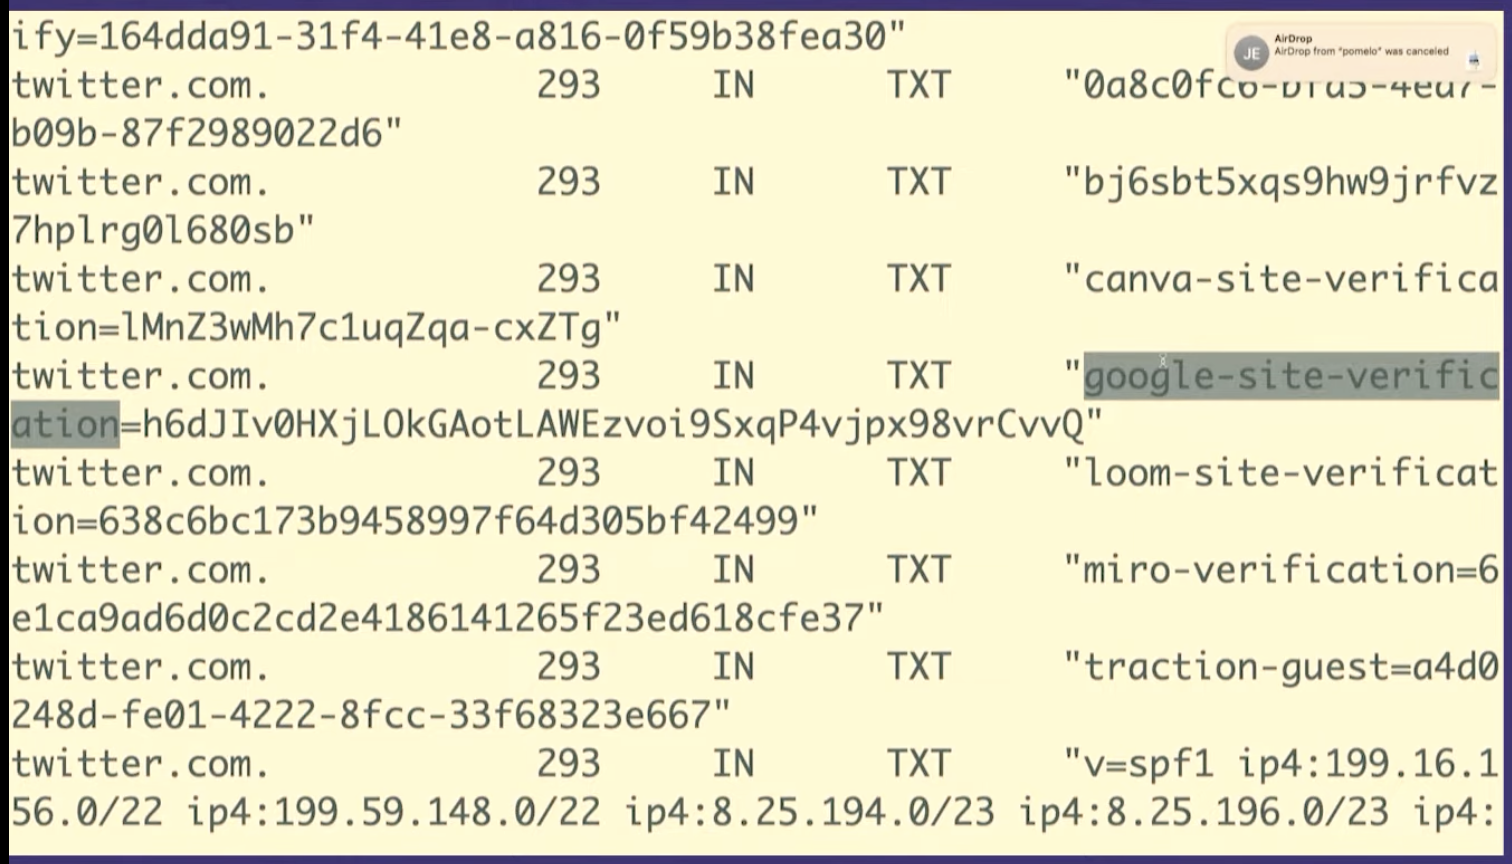
But there are other kinds of records like TXT records. So we're going to look at a TXT record really quickly just because I think this is very fun. We're going to look at twitter.com's TXT records.
So TXT records are something that people use for domain verification, for example to prove to Google that you own twitter.com.
So what you can do is you can set this DNS
record google-site-verification. Google will tell you what to set
it to, you'll set it, and then Google will believe you.
I think it's kind of fun that you can like kind of poke around with DNS and see that Twitter is using Miro or Canva or Mixpanel, that's all public. It's like a little peek into what people are doing inside their companies
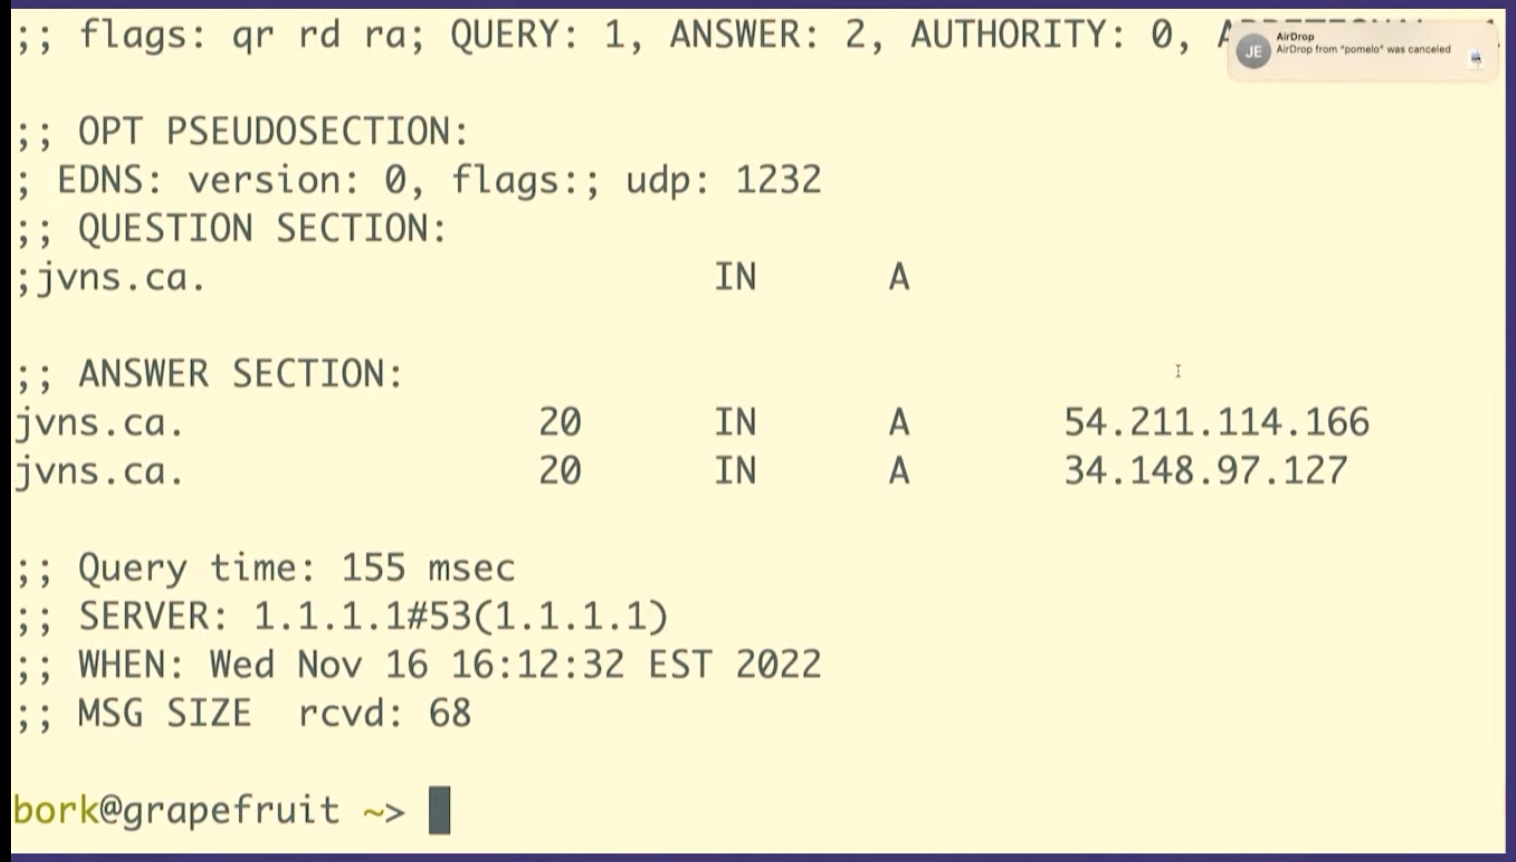

+noall +answer and
then your dig responses look much nicer (like they did in the screenshots
above) instead of having a lot of nonsense in them. Whenever possible, I try to
make my tools behave in a more human way.


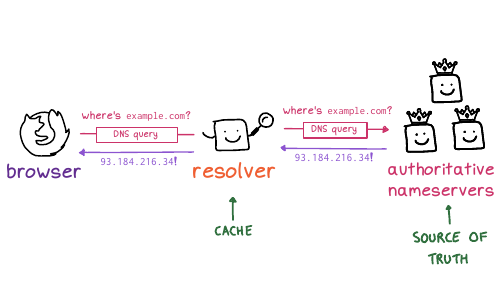

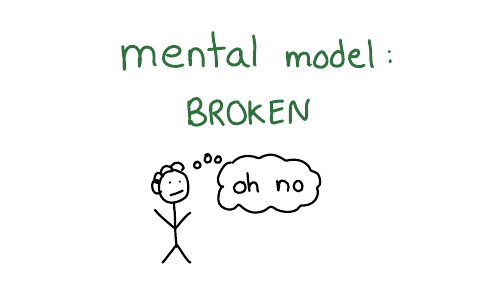
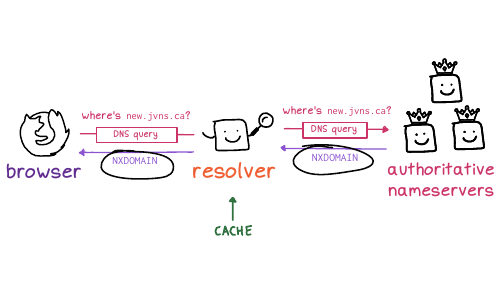
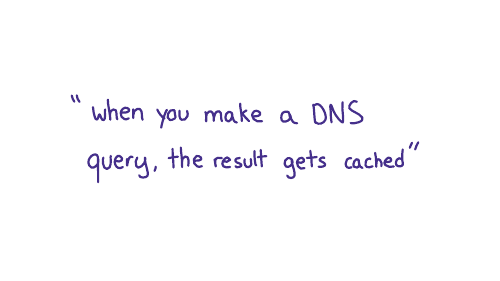
And so here's what it said might be going on. The first time I opened the website (before the DNS records had been set up), the DNS servers returned a negative answer, saying hey,this domain doesn't exist yet. The code for that is NXDOMAIN, which is like a 404 for DNS.
And the resolver cached that negative NXDOMAIN response. So the fact that it didn't exist was cached.
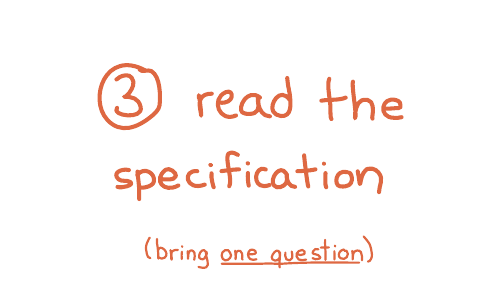
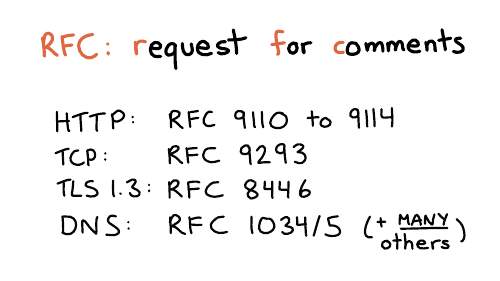
In networking, everything has a specification. The boring technical documents are called RFC is for request for comments. I find this name a bit funny, because for DNS, some of the main RFCs are RFC 1034 and 1035. These were written in 1987, and the comment period ended in 1987. You can definitely no longer make comments. But anyway, that's what they're called.
I personally kind of love RFCs because they're like the ultimate answer to many questions. There's a great series of HTTP RFCs, 9110 to 9114. DNS actually has a million different RFCs, it's very upsetting, but the answers are often there. So I went looking. And I think I went looking because when I read comments on StackOverflow, I don't always trust them. How do I know if they're accurate? So I wanted to go to an authoritative source.

So, um, ok, cool. What does that mean, right? Luckily, we only have one question: I don't need to read the entire boring document. I just need to like analyze this one sentence and figure it out.
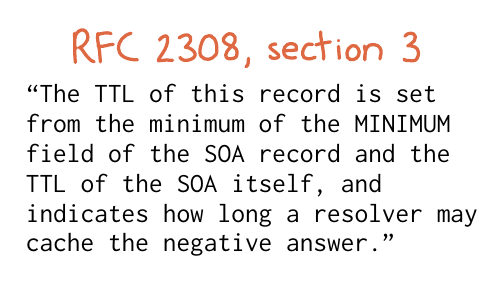
So it's saying that the cache time depends on two fields. I want to show you the actual data it's talking about, the SOA record.
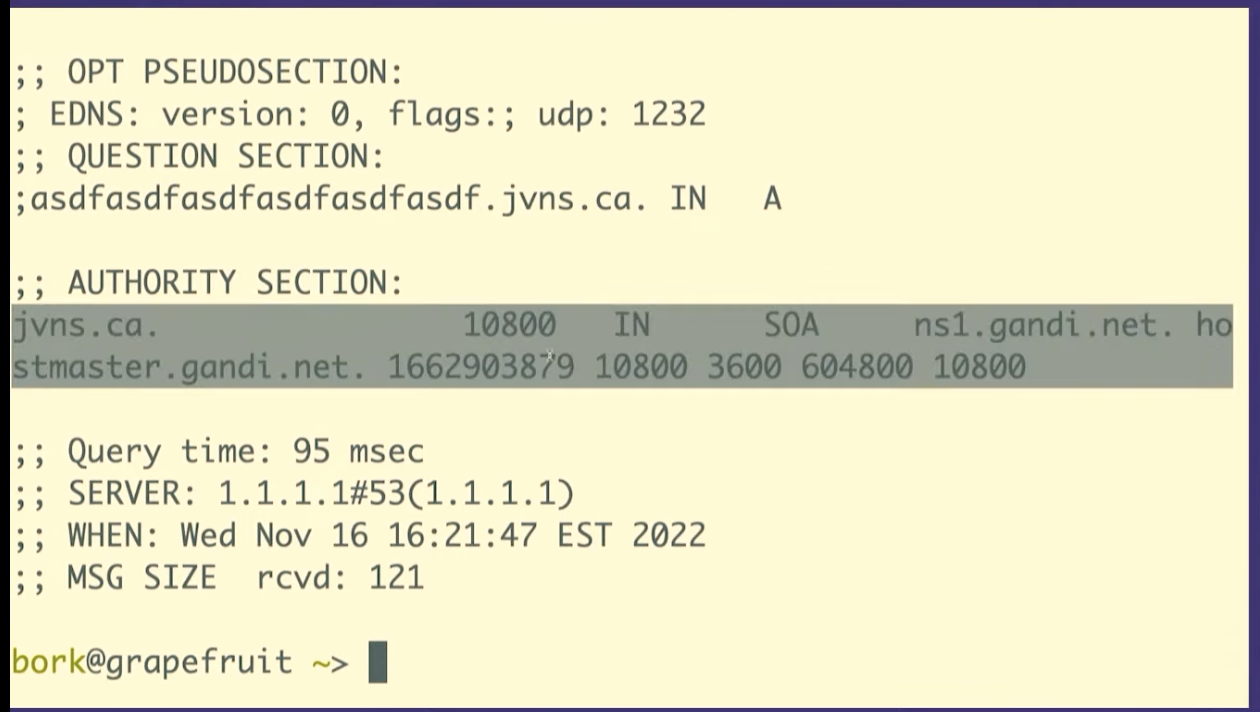
dig +all asdfasdfasdfasdfasdf.jvns.ca
It says that the domain doesn't exist, NXDOMAIN. But it also returns this
record called the SOA record, which has some domain metadata. And there are two
fields here that are relevant.

Here. I put this on a slide to try to make it a little bit clearer. This slide is a bit messed up, but there's this field at the end that's called the MINIMUM field, and there's the TTL, time to live of the record, that I've tried to circle.
And what it's saying is that if a record doesn't exist, the amount of time the resolver should cache "it doesn't exist" for is the minimum of those two numbers.
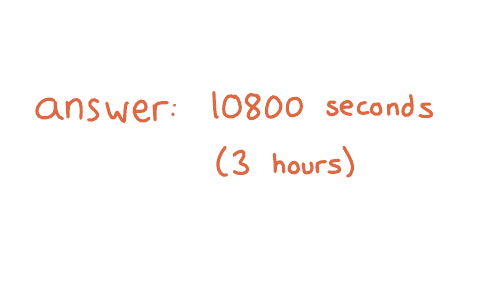

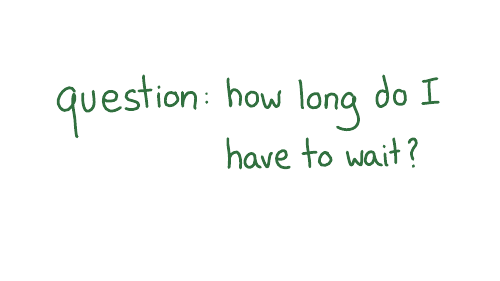
And so I waited three hours and then everything worked. And I found this kind of fun to know because often like if you look up DNS advice it will say something like, if something has gone wrong, you need to wait 48 hours. And I do not want to wait 48 hours! I hate waiting. So I love it when I can like use my brain to figure out that I can wait for less time.

Sometimes when I find my mental model is broken, it feels like I don't know anything
But in this case, and I think in a lot of cases, there's often just a few things I'm missing? Like this negative caching thing is like kind of weird, but it really was the one thing I was missing. There are a few more important facts about how DNS caching works that I haven't mentioned, but I haven't run into more problems I didn't understand since then. Though I'm sure there's something I don't know.
So sometimes learning one small thing really can solve all your problems.
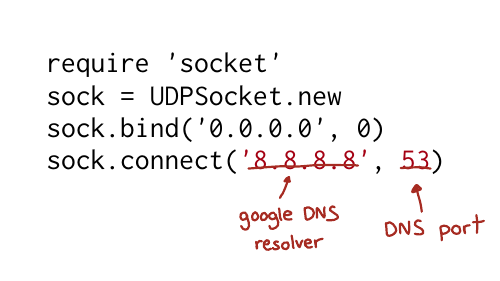
So let's say we want to do some experiments with caching.
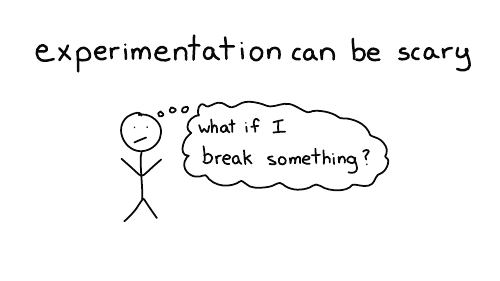
I think most people don't want to make experimental changes to their domain names, because they're worried about breaking something. Which I think is very understandable.

Because I was really into DNS, I wanted to experiment with DNS. And I also wanted other people to experiment with DNS without having to worry about breaking something. So I made this little website with my friend, Marie, called Mess with DNS
The idea is, if you don't want to do that DNS experiments on your domain, you can do them on my domain. And if you mess something up, it's my problem, it's not your problem. And there have been no problems, so that's fine.
So let's use Mess With DNS to do a little DNS experimentation
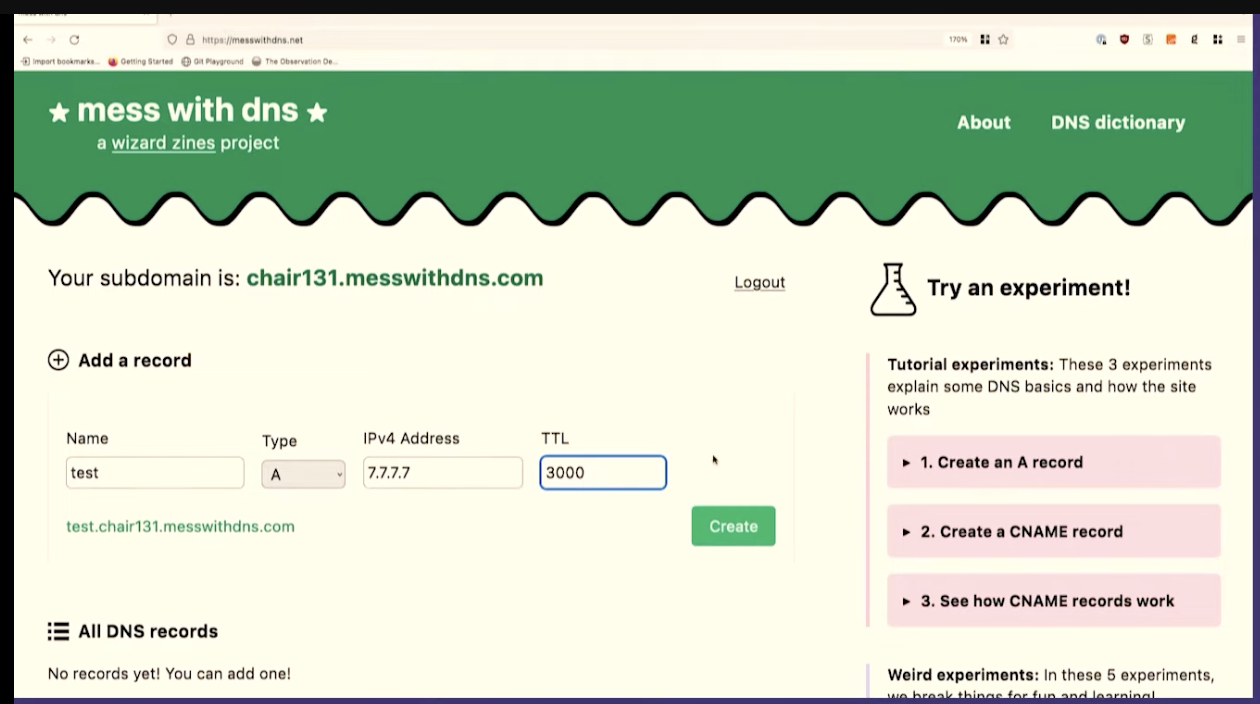

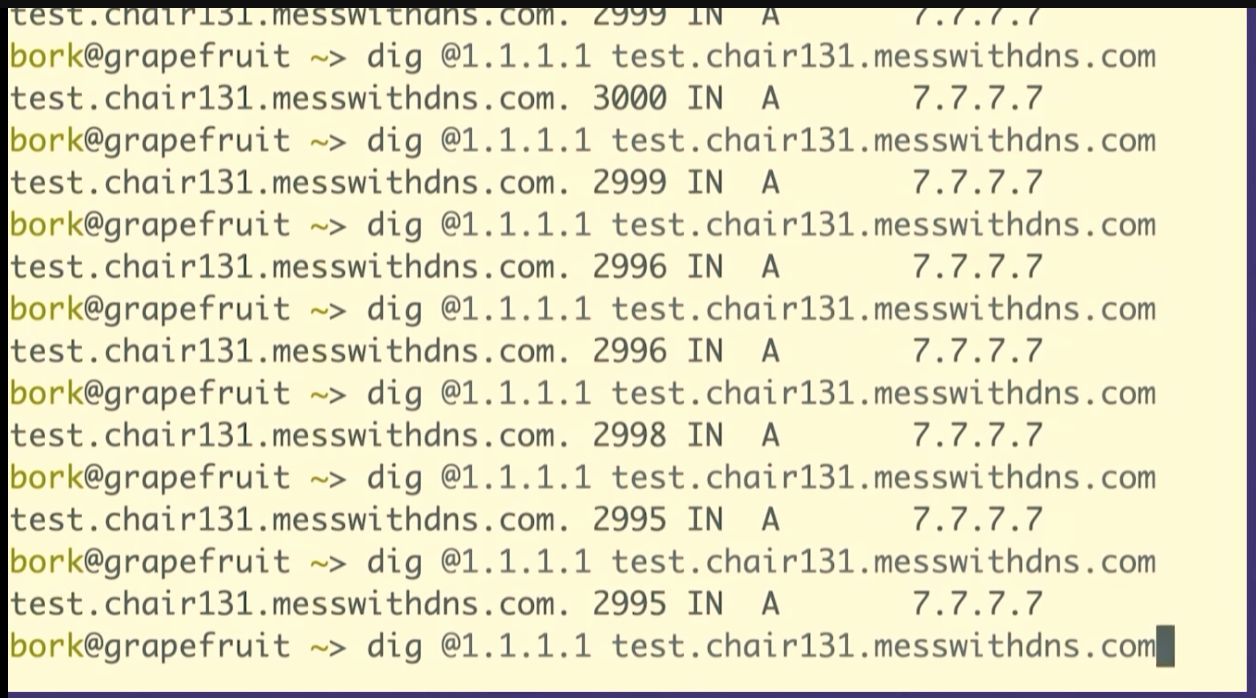
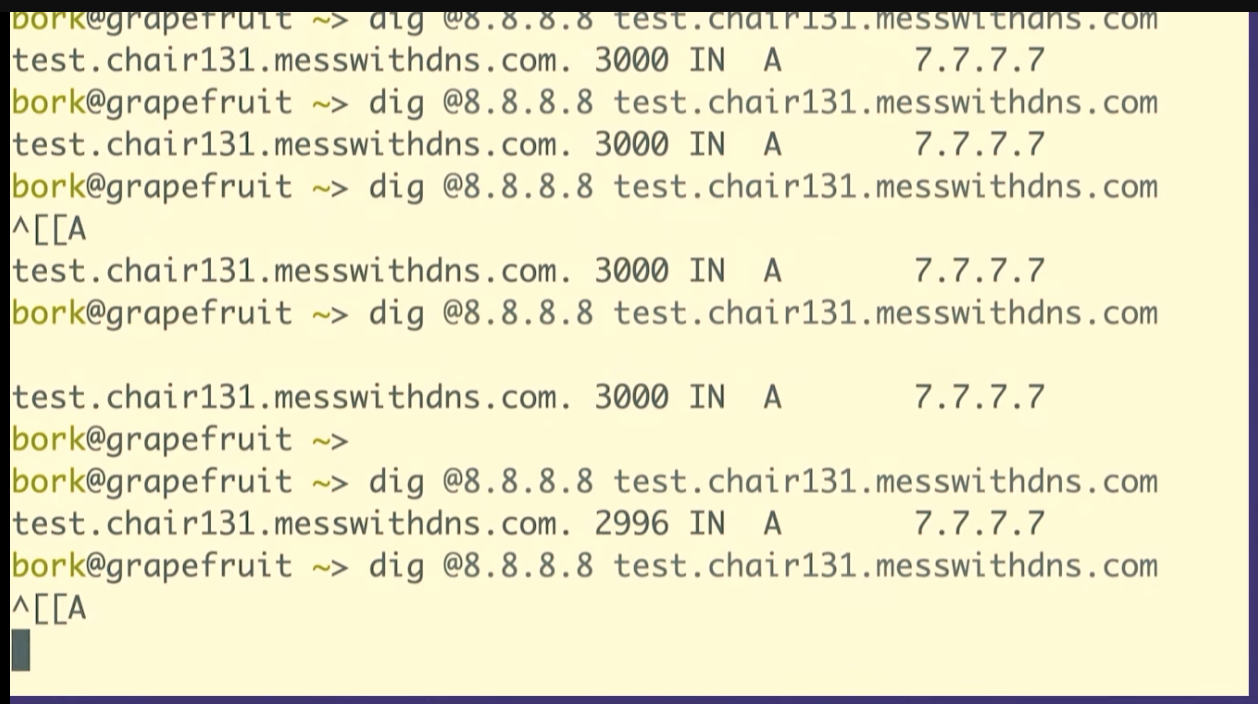
dig @1.1.1.1 test.chair131.messwithdns.com.
I've queried it a bunch of times, maybe 10 or 20.
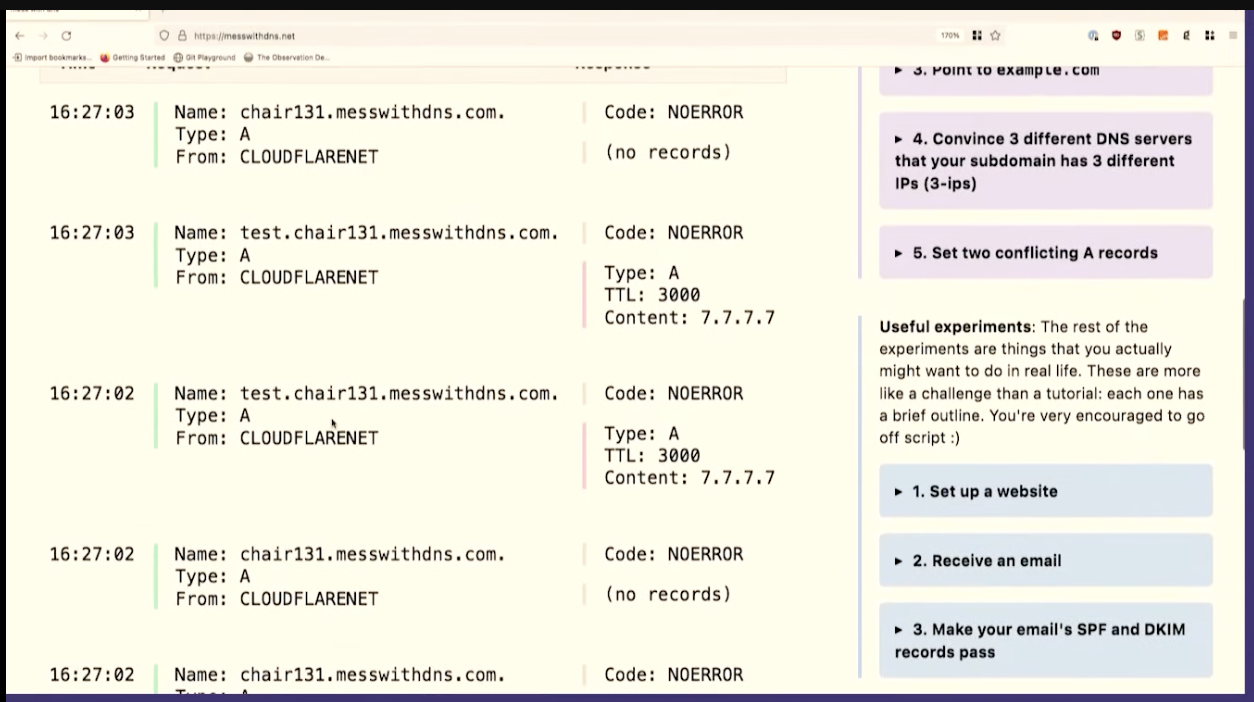
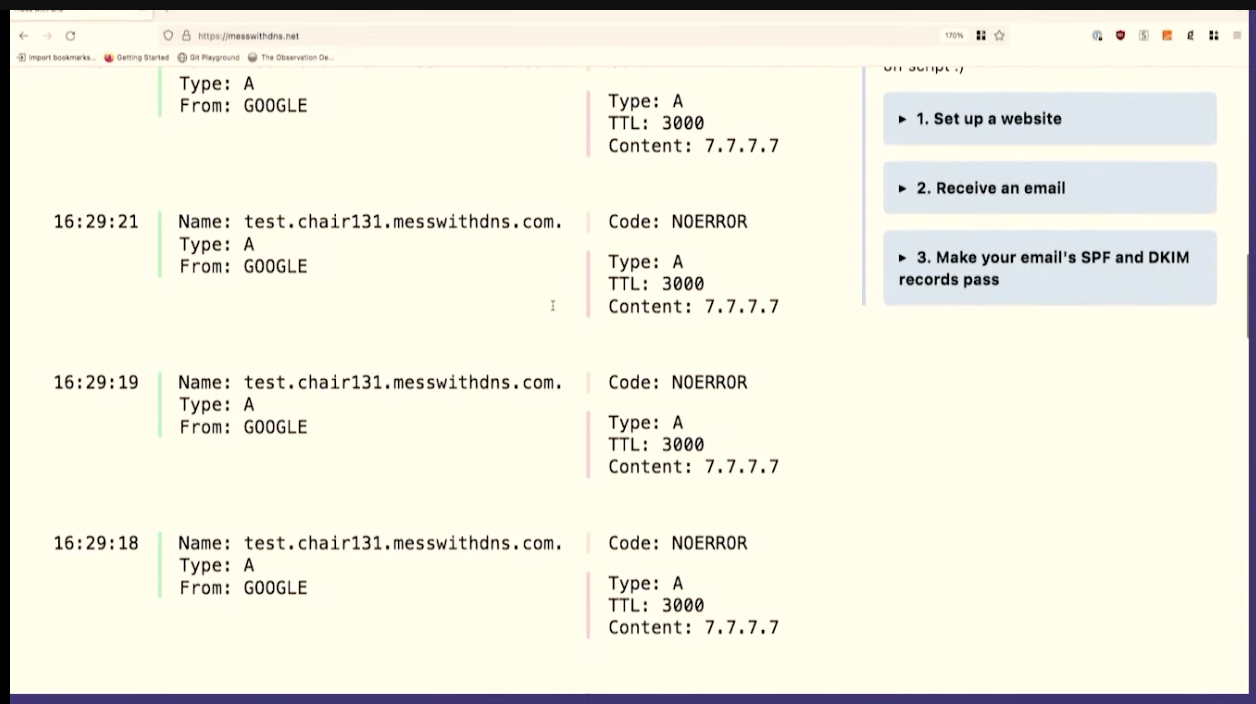
Oh, cool. This isn't what I expected to see. This is fun, though, that's great. We made about 20 queries for that DNS record. The server logs all queries it receives, so we can count them. Our server got 1, 2, 3, 4, 5, 6, 7, 8 queries. That's kind of fun. 8 is less than 20.
One reason I like to do demos live on stage is that sometimes what I what happens isn't exactly what I think will happen. When I do this exact experiment at home, I just get 1 query to the resolver.
So we only saw like eight queries here. And I assume that this is because the resolver, 1.1.1.1, we're talking to has more than one independent cache, I guess there are 8 caches. This makes sense to me because Cloudflare's network is distributed -- the exact machines I'm talking to here in Providence are not the same as the ones in Montreal.
This is interesting because it complicates your idea about how caching works a little bit, right? Like maybe a given DNS resolver actually has like eight caches and which one you get is random, and you're not always talking to the same one. I think that's what's going on here.


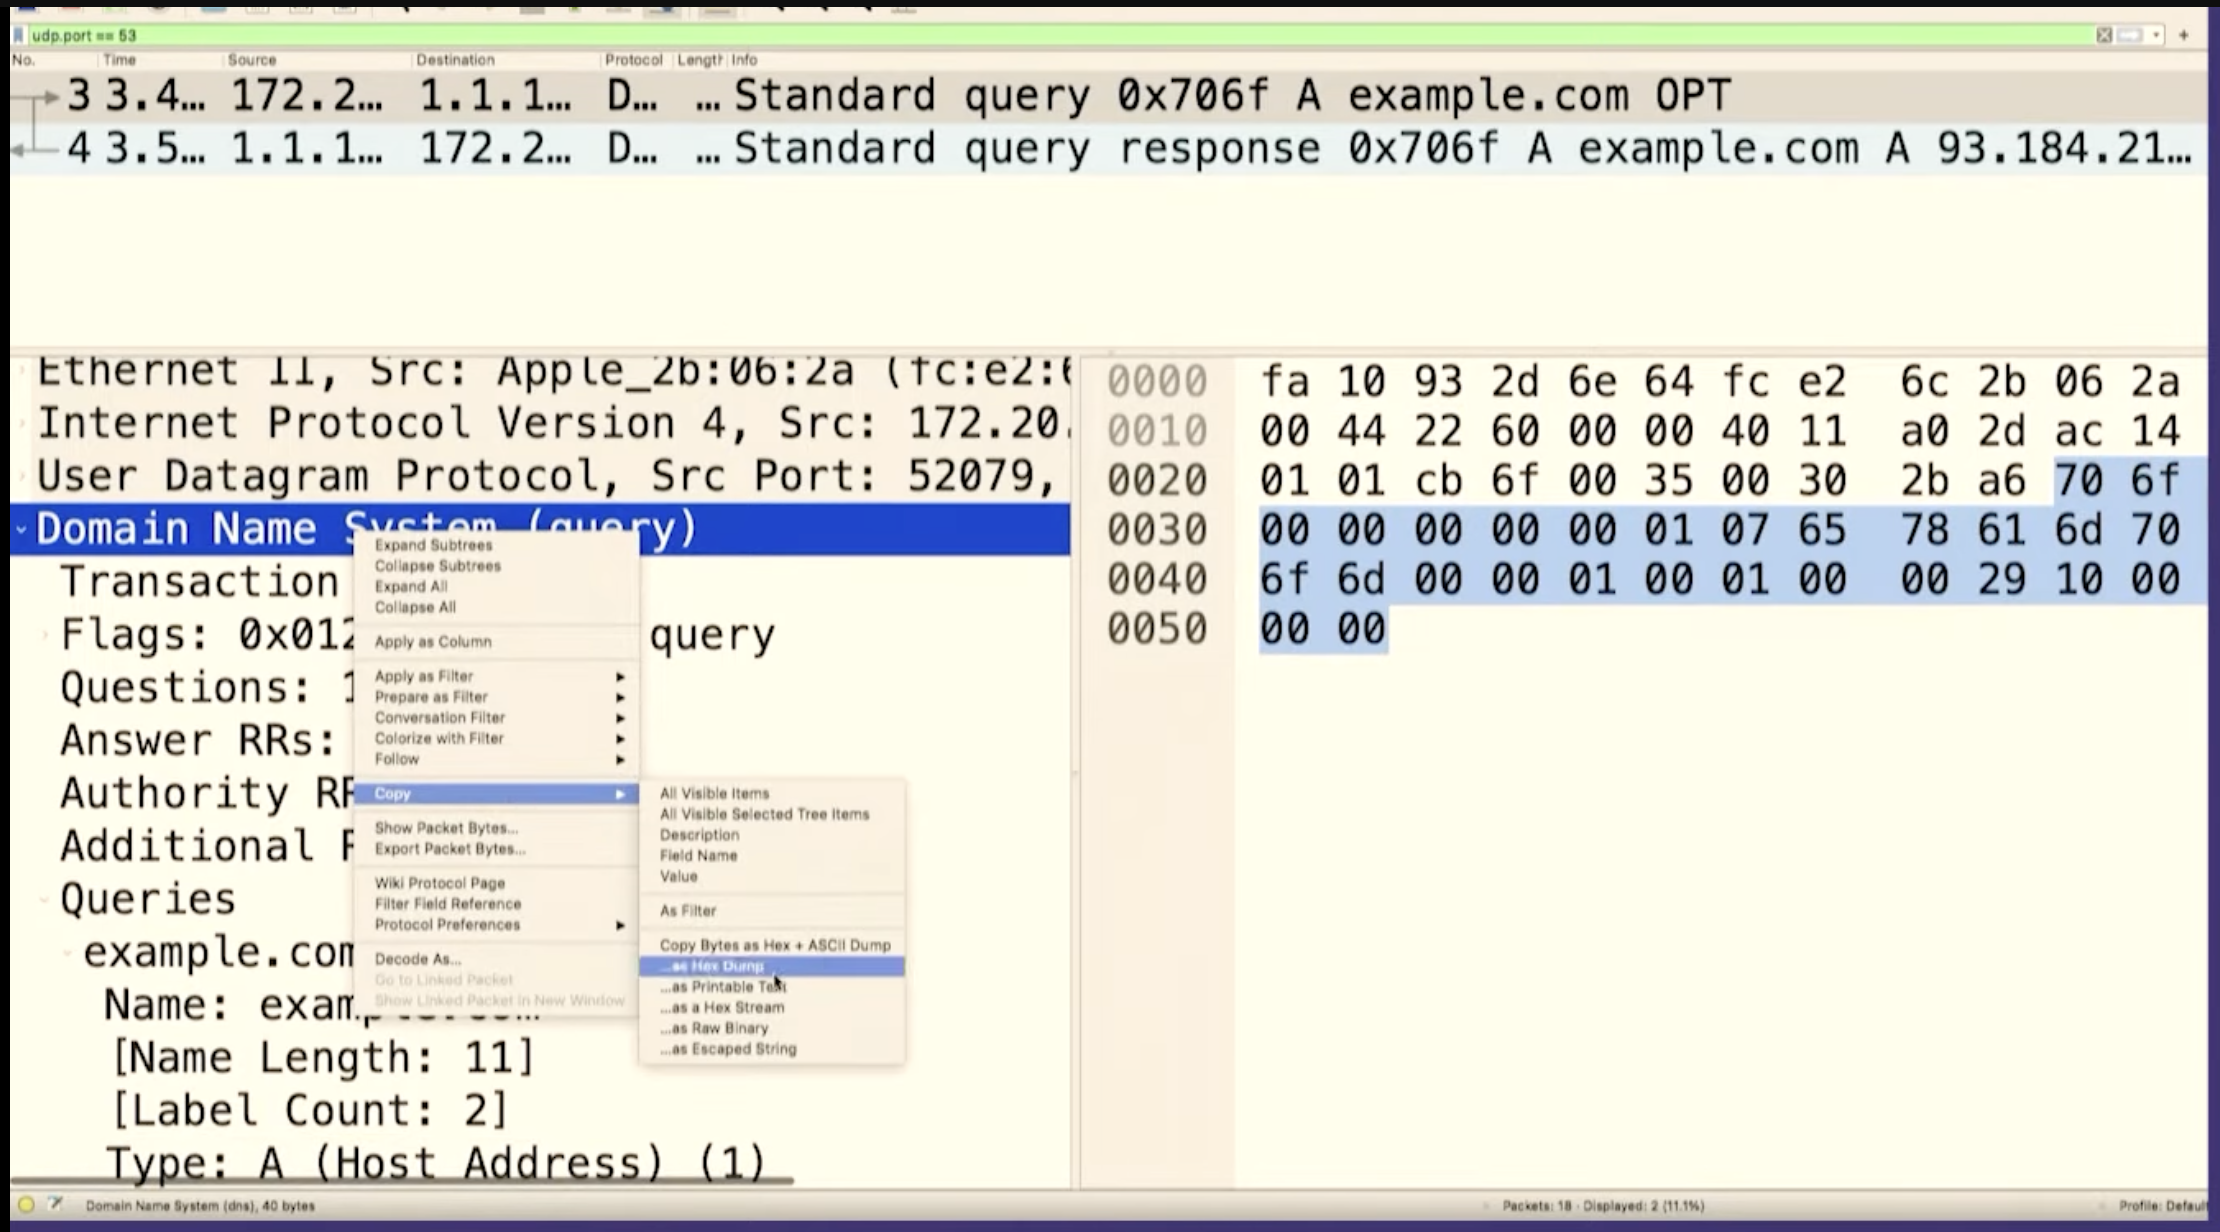

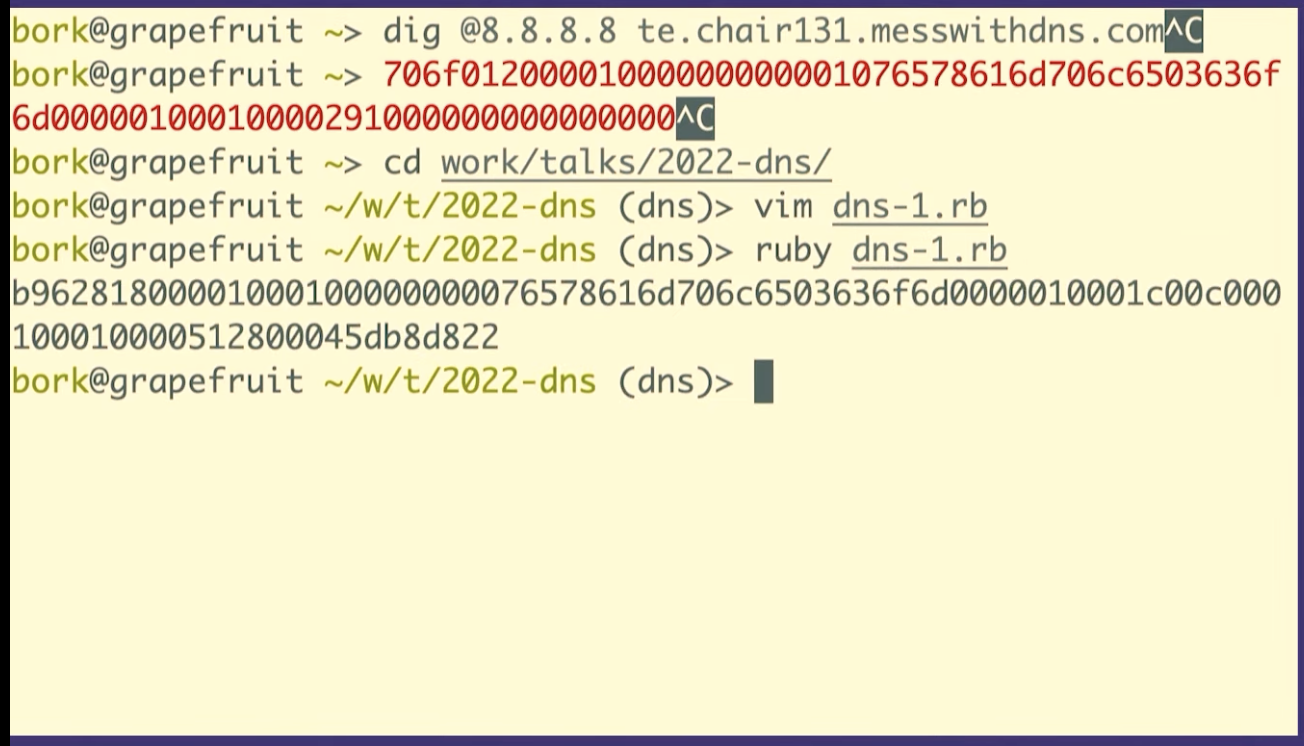

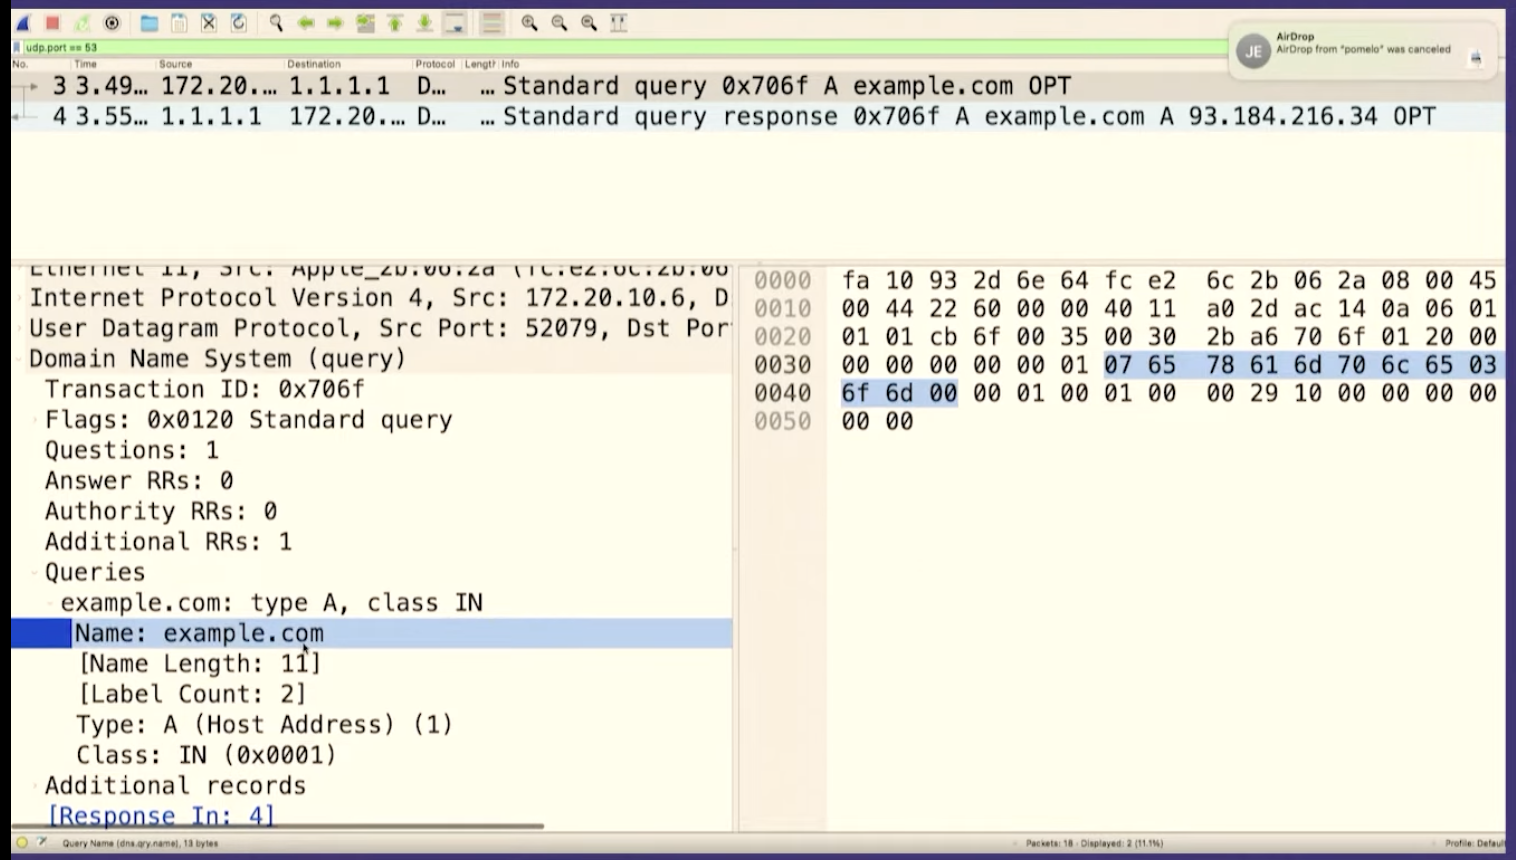
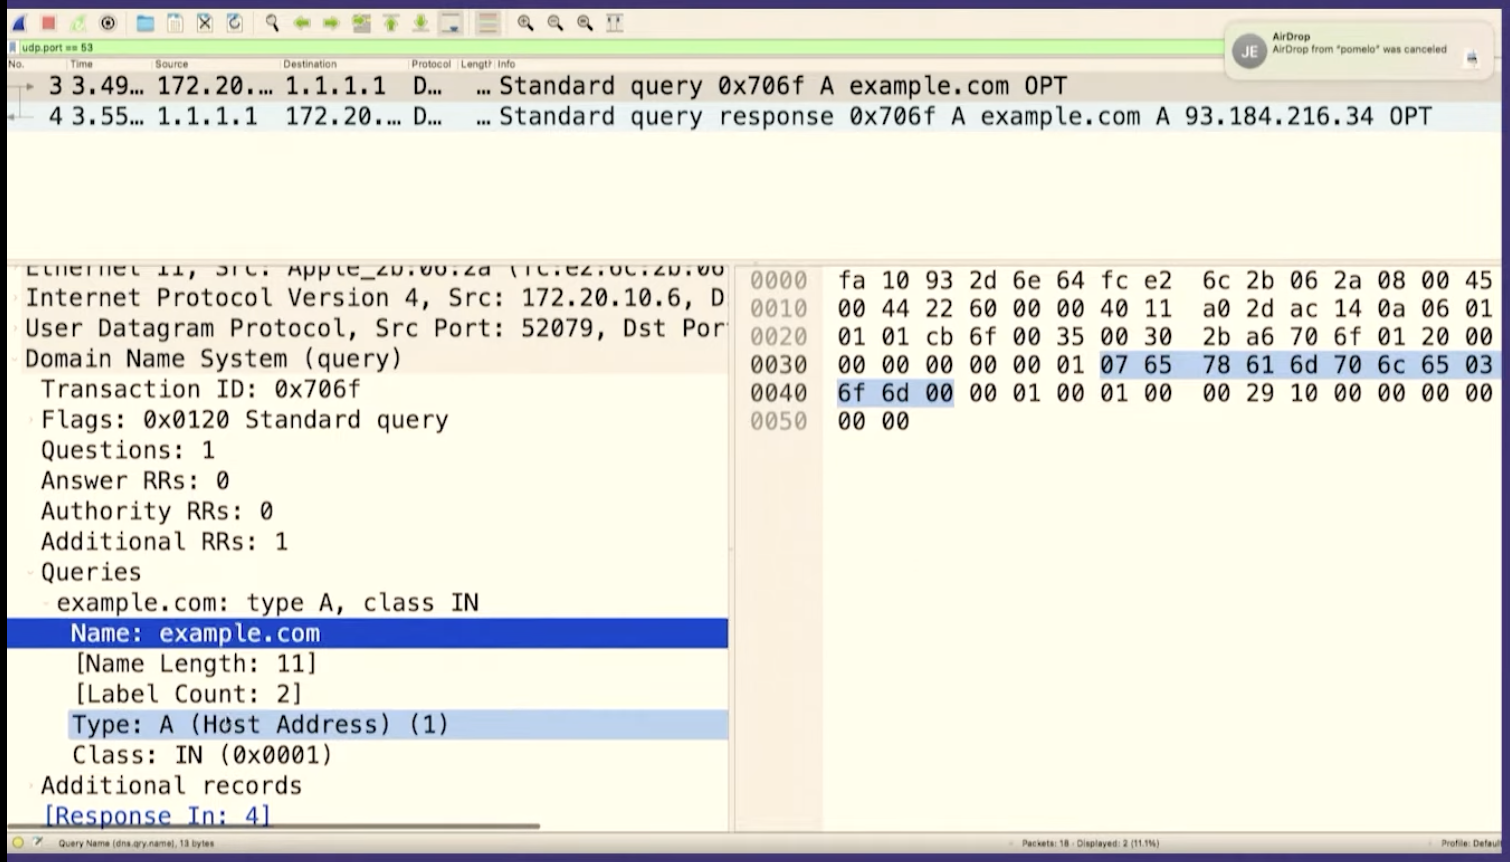
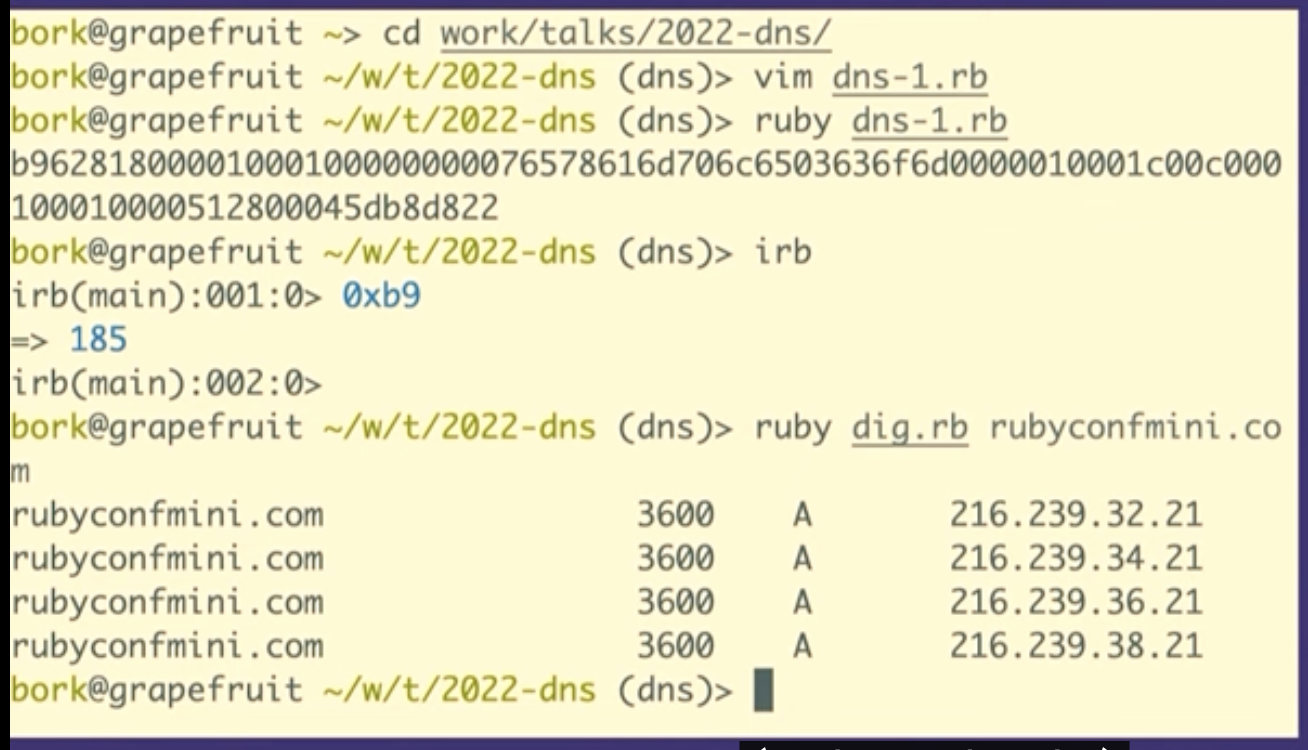
Let's go to Wireshark and look for the packet we just sent. And we can see it there! There's some other noise in between, so I'll stop the capture.
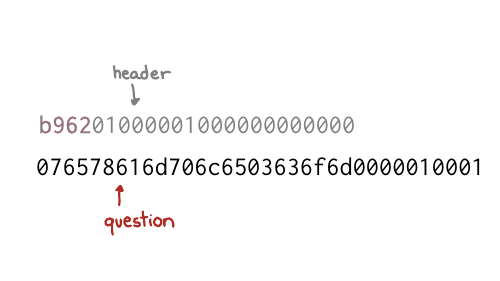
We can see that it's the same packet because the query ID matches, B962.
So we sent a query to Google the answer server and we got a response right? It was like this is totally legitimate. There's no problem. It doesn't know that we copied and pasted it and that we have no idea what it means!

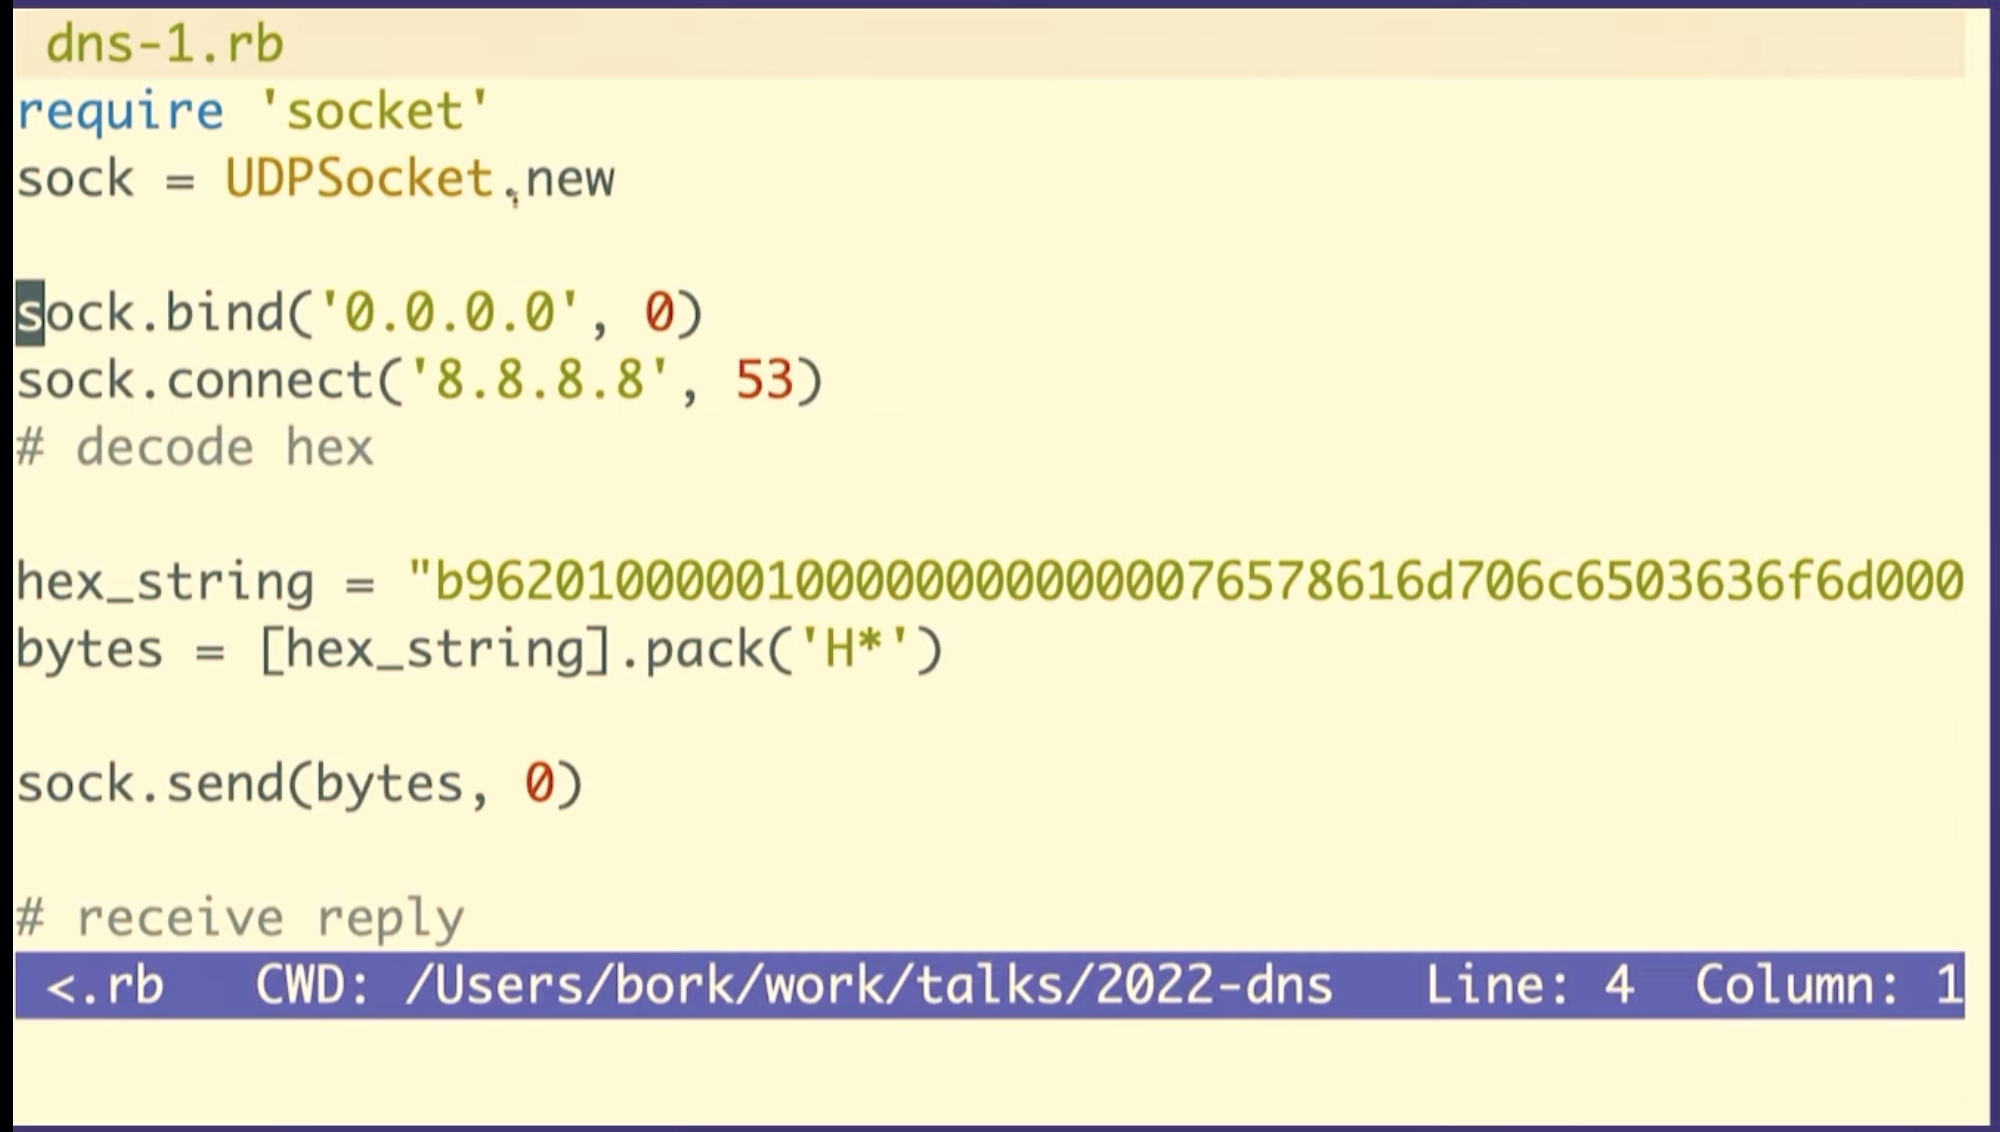
We're going to see how to construct these in Ruby, but first I want to talk about what a byte is for one second. So this (b9) is the hexadecimal representation of a byte. The way I like to look at figure out what that means is just type it into IRB, if you type in 0xB9 it'll print out, that's the number 184.
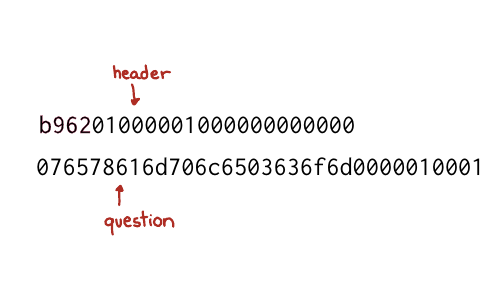
So the question is 12 bytes

b962 which is the query ID. The next number is the flags, which
basically in this case, means like this is a query like hello, I have a
question. And then there's four more sections, the number of questions and then
the number of answers. We do not have any answers. We only have a question. So
we're saying, hello, I have one question. That's what the header means.
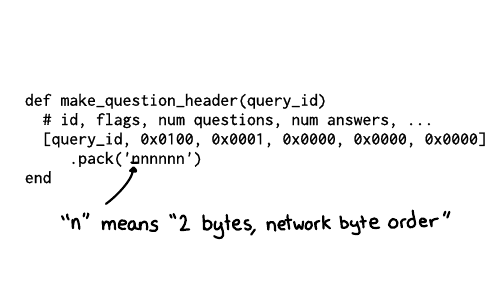
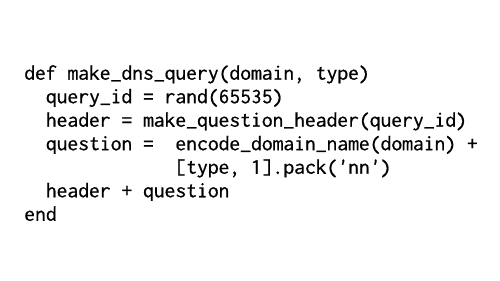
And the way that we can do this in Ruby, is we can make a little array that has the query ID, and then these numbers which correspond to the other the other header fields, the flags and then 1 for 1 question, and then three zeroes for each of the 3 sections of answers.
And then we need to tell Ruby how to take these like six numbers and then represent them as bytes. So n here means each of these is supposed to represent it as two bytes, and it also means to use big endian byte order.
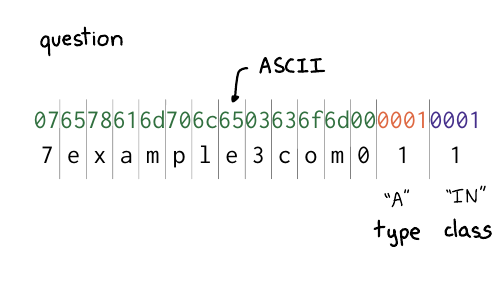
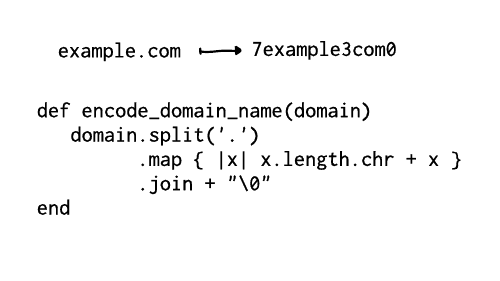
I broke up the question section here. There are two parts
you might recognize from example.com: there's example, and com.
The way it works is that first you have a number (like 7), and then a
7-character string, like "example". The number tells you how many characters to
expect in each part of the domain name. So it's 7, example, 3, com, 0.
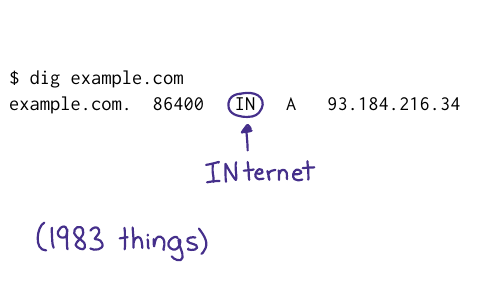
And then at the end, you have two more fields for the type and the class. Class 1 is code for "internet". And type 1 is code for "IP address", because we want to look up the IP address. is

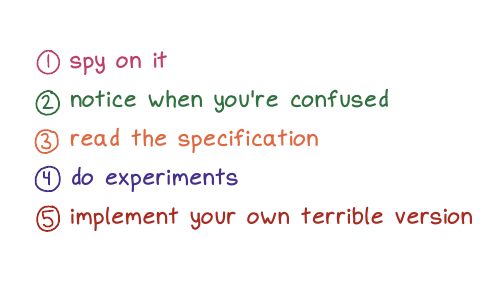
First, spy on it. I find that when I look at things like to see like really what's happening under the hood, and when I look at like, what's in the bytes, you know what's going on? It's often like not as complicated as I think. Like, oh, there's just the domain name and the type. It really makes me feel far more confident that I understand that thing.
I try to notice when I'm confused, and I want to say again, that noticing when you're confused is something that like we don't always have time for right? It's something to do when you have the energy. For example there's this weird DNS query I saw in one of the demos today that I don't understand, but I ignored it because, well, I'm giving a talk. But maybe one day I'll feel like looking at it.
We talked about reading the specification, which, there are few times I feel like more powerful than when I'm in like a discussion with someone, and I KNOW that I have the right answer because, well, I read the specification! It's a really nice way to feel certain.
I love to do experiments to check that my understanding of stuff is right. And often I learn that my understanding of something is wrong! I had an example in this talk that I was going to include and I did an experiment to check that that example was true, and it wasn't! And now I know that. I love that experiments on computers are very fast and cheap and usually have no consequences.
And then the last thing we talked about and truly my favorite, but the most work is like implementing your own terrible version. For me, the confidence I get from writing like a terrible DNS implementation that works on 11 different domain names is unmatched. If my thing works at all, I feel like, wow, you can't tell me that I don't know how DNS works! I implemented it! And it doesn't matter if my implementation is "bad" because I know that it works! I've tested it. I've seen it with my own eyes. And I think that just feels amazing. And there are also no consequences because you're never going to run it in production. So it doesn't matter if it's terrible. It just exists to give you huge amounts of confidence in yourself. And I think that's really nice.

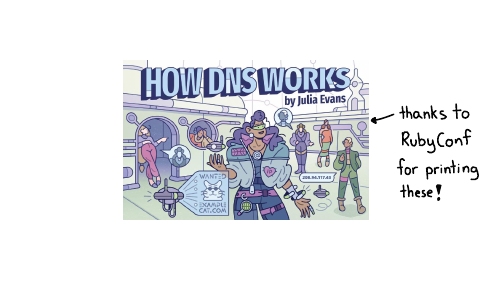
thanks to the organizers!
Thanks to the RubyConf Mini organizers for doing such a great job with the conference – it was the first conference I’d been to since 2019, and I had a great time.
a quick plug for “How DNS Works”
If you liked this talk and want to to spend less than 10 years learning about how DNS works, I spent 6 months condensing everything I know about DNS into 28 pages. It’s here and you can get it for $12: How DNS Works.
New playground: integer.exposed
Hello! For the last few months we’ve been working on a zine about how integers and floating point numbers work. Whenever I make a zine I like to release a playground to go with it, like mess with dns for the DNS zine or the sql playground.
For this one, I made a simple playground called integer.exposed, inspired by Bartosz Ciechanowski’s float.exposed.
It’s a lot less elaborate than Mess With DNS, so I’ll keep this blog post short.
the inspiration: float.exposed
I did a couple of talks about how integers and floating point work last month, and in the talk about floating point I found myself CONSTANTLY referring to this site called Float Exposed by Bartosz Ciechanowski to demonstrate various things. (Aside: If you haven’t seen Ciechanowski’s incredible interactive explainers on bicycles, mechanical watches, lenses, the internal combustion engine, and more, you should check them out!)
Here’s what it it looks like:
Things I’ve done with it:
- Increment the significand of a float (to show people how close together successive floats are)
- Show special values like NaN and infinity, and show how if you change the bits in NaN, it’s still NaN
- Go to a large integer value and show how the distance between floats is very large
- Show how you get drastically different precision for one million as a 32-bit float and as a 64-bit float (try incrementing the significand for each one!)
and lots more! It’s an incredible way to get hands on with floats and improve your intuition around how they work.
float.exposed, but for integers
Integers aren’t as complicated as floats, but there are some nonobvious things about them: you have signed integers and unsigned integers, you have endianness, and there are some weird operations like right/left shift. So when I was talking about integers, I found myself wanting a similar website to float.exposed to demonstrate things.
So with permission, I put one together at integer.exposed. Here’s a screenshot:
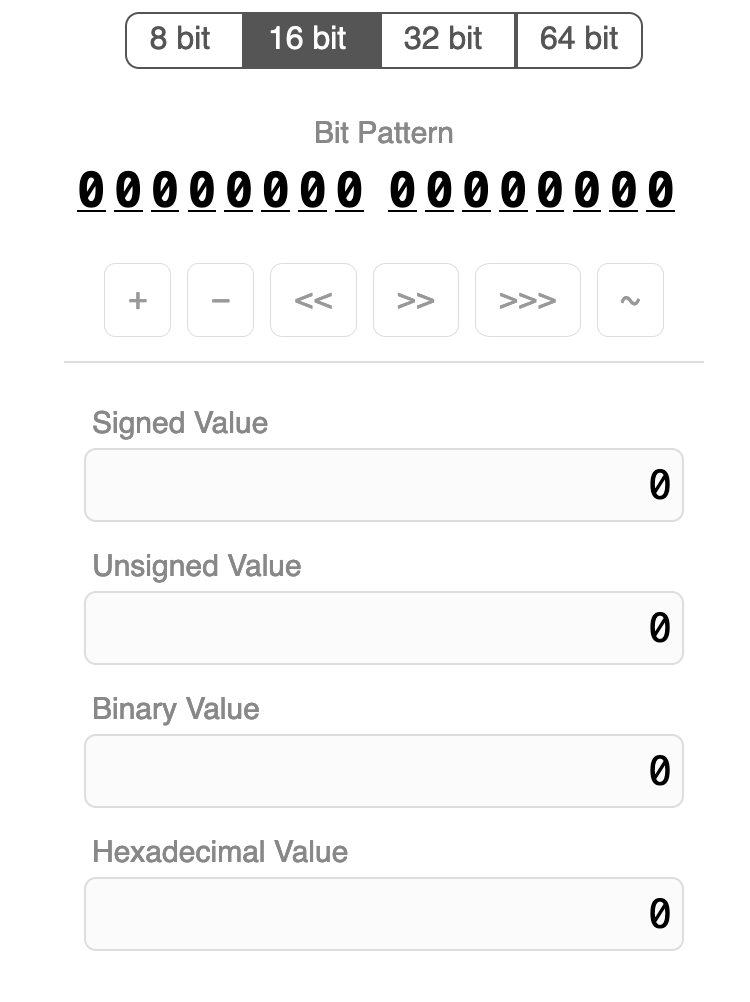
The UI is a little different: integers don’t have many different parts the way floating point numbers do, so there’s a single row of buttons that you can use to do various operations on the integer.
A note on byte order: Like float.exposed, it uses a big endian byte order, because I think it’s more intuitive to read. But you do have to keep in mind that on most computers the bytes will actually be in the reverse order.
some interesting things to try
Here are some things I think are fun to try:
- signed integers: Look at how -1 is represented. Increment and decrement it a few times and see how the signed and unsigned values change. Do the same with -128. Also look at how -1 is represented as a 16/32/64-bit integer.
- signed/unsigned right shift: Similarly with -1: try out signed right shift (also known as “arithmetic right shift”) and see how the result is different from unsigned right shift (aka “logical right shift”).
- counting in binary: Start at 0 and increment a bunch of times and watch the binary value count up.
- not: Take any number (like 123) and NOT it. See how
NOTis almost exactly the same as negation, but not quite. - swap the byte order. Take a number like 12345678 and see how if you swap the byte order, the result is an unrecognizably different number.
- look at how powers of 2 are represented
the tech stack
As usual for me it uses Vue.js. If you want to see how it works you can just
view source – it’s only two files, index.html and script.js.
I took a bunch of the CSS from float.exposed.
that’s all!
Let me know if you notice any bugs! I might add more features, but I want to keep it pretty simple.
I’ve also built another more involved playground that I’m hoping to release and write up soon.
A list of programming playgrounds
I really like using (and making!) programming playgrounds, and I got thinking the other day about how I didn’t have a great list of playgrounds to refer to. So I asked on Mastodon for links to cool playgrounds.
Here’s what I came up with. I’d love to know what I missed.
- Compilers: godbolt compiler explorer by Matt Godbolt
- Shaders: shadertoy by Inigo Quilez and Pol Jeremias
- Arduino / IoT: wokwi from CodeMagic
- CSS/HTML/JS: CodePen by Chris Coyier, Alex Vasquez, and team
- CSS/HTML/JS: JSFiddle by Oskar Krawczyk and Piotr Zalewa
- CSS/HTML/JS: flems by Rasmus Porsager (saves all state in the URL)
- regular expressions:
- DNS: Mess With DNS by Julia Evans and Marie Flanagan
- DNS: DNS lookup tool by Julia Evans
- nginx: nginx playground by Julia Evans
- varnish: fastly fiddle from fastly
- SQLite: sqlime by Anton Zhiyanov (lets you load arbitrary SQLite databases)
- SQL: DB fiddle from Status200
- SQL: sql playground by Julia Evans
- Postgres: postgres playground from Crunchydata (runs postgres in the browser!)
- Git: oh my git by blinry and bleeptrack
- .NET bytecode: SharpLab by Andrey Shchekin
- Python bytecode: dis this by Pamela Fox
data formats
- Floating point: Float Exposed by Bartosz Ciechanowski
- Unicode: Unicode analyzer from fontspace
- Unicode: What unicode character is this? from babelstone
- ASN.1 certificates: ASN.1 JavaScript debugger by Lapo Luchini
- SVG: sssvg (interactive SVG reference) from fffuel (lots of other cool tools there)
- CBOR: CBOR playground
- JSON: JSON editor online by Jos de Jong
- cron: crontab guru from cronitor
programming languages
- official playgrounds:
- unofficial playgrounds:
- PHP: 3v4l by Sjon Hortensius
- Python/JS/C/C++/Java: Python Tutor by Philip Guo
- Javascript: JS Console by @rem
- many languages: riju by Radon Rosborough
- many languages: replit
- others: jqplay for jq, tryapl for APL
Building a custom site for zine feedback
Hello! A few years I wrote a post called A new way I’m getting feedback on my posts: beta readers! about how I’d started using beta readers.
The basic strategy for getting feedback there was to email people a PDF and ask for feedback. This was kind of inefficient, and so over the past couple of years, I’ve worked a lot with Marie Flanagan to improve the process. In this post we’ll talk about:
- the custom site we built to handle all of the feedback
- how (and why) we designed that site
- the specific categories of feedback we ask for (and why we chose those categories)
The site isn’t open source, this post is just about the process of building and using it. There are some screenshots further down.
First, let’s talk about some problems with the original process.
problem 1: managing the feedback was awkward
The original process for getting feedback from beta readers was to send an email to people asking them for feedback, and then semi-manually collate the replies.
For each comment I got, I needed to figure out whether I wanted to address it or not, and then mark it as completed once it was handled.
I originally handled this by:
- making a Trello card for each page of the zine
- adding each comment to the Trello card for the appropriate page (either manually or with a Python script)
- checking off the comments when they were handled
This kind of worked, but it wasn’t great. I could only ask at most 10 people for feedback because the overhead of managing all the replies was just too much for me.
problem 2: the feedback wasn’t categorized
The second problem I ran into was that the feedback wasn’t really categorized or tagged in any way, and this made it much harder to decide what I should do about each piece of feedback.
For example – one comment I got was “CSS often seems random to me”. Is the person suggesting that I explain more about CSS on the page? Do they want to be convinced that CSS isn’t random? Do they think CSS is a bad example of the thing I’m trying to illustrate? Are they confused about why I’m bringing up CSS at all? Without more context, it’s hard to tell.
There was also lots of feedback that I could easily understand and incorporate, but I really wanted to set more guidelines so that people could give me the kind of feedback I needed.
the inspiration: Help This Book
In 2021, I read a great book called Write Useful Books by Rob Fitzpatrick. One of the main suggestions in the book was to gather feedback early and often from beta readers.
But their way to get feedback wasn’t just “email people and have them write you back!” It came with a custom website for readers to comment on in-progress books called Help This Book.
Here’s a screenshot of Help This Book, from their homepage:
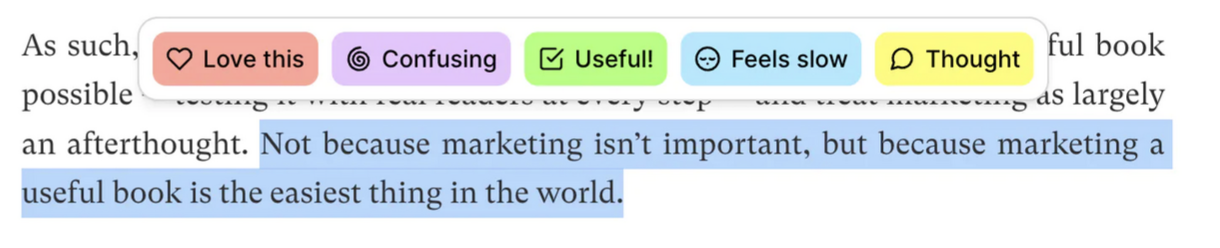
In this screenshot, the reader has highlighted a sentence and is being prompted for what kind of feedback they want to provide. After they click on an icon (like “Confusing”, they’ll be able to type in their comment).
but Help This Book didn’t work with images
My zines aren’t text, so this kind of Google Docs-style interface where you highlight text wouldn’t really work for me.
So in 2021 I asked Marie if they would help me build a custom site to collect feedback on zines, very heavily inspired by Help This Book.
The hardest parts were:
- Deciding the categories of feedback we wanted to ask for from readers
- Designing the site
As usual, actually writing the code was the easy part, so I’m not going to talk about that.
categories help guide people’s feedback
Before I talk about the feedback categories we chose, I want to talk about why feedback categories are so important.
In the “Help This Book” interface (and in the interface of the tool we build), the categories help guide people’s feedback – before someone even starts writing, they need to click on a category for the feedback.
This is helpful for a few reasons:
- It helps remove types of feedback we don’t want. For example, there’s no category for “this is a typo”, because we don’t want people to point out typos – that’s the copy editor’s job :)
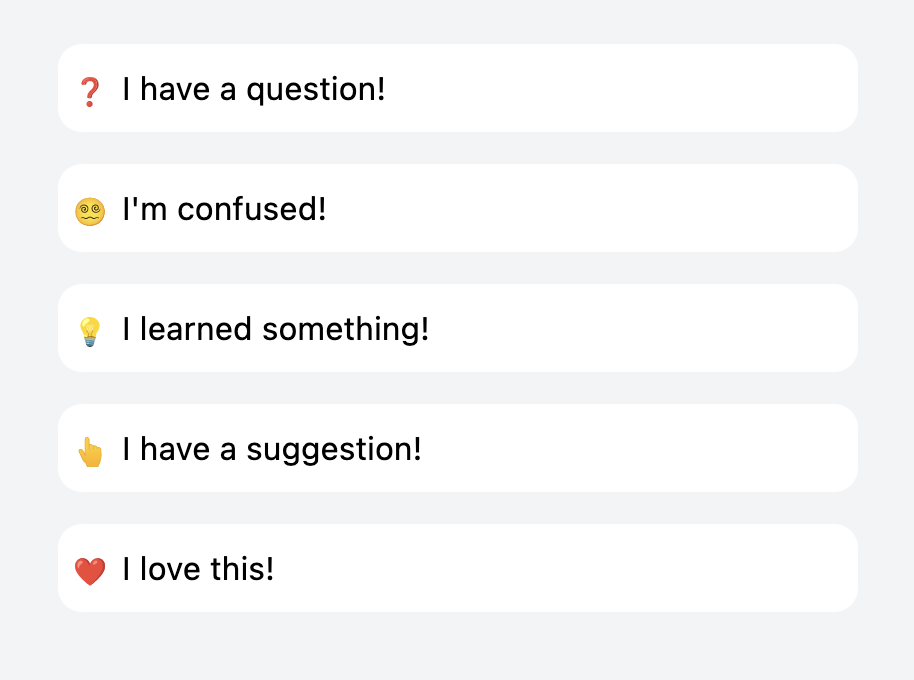
- It guides people to phrase their feedback in a form that’s easier to take action on. For example: “I love this” feedback generally doesn’t require any action, but if someone says “This is confusing”, we probably need to clarify something.
- We can easily group similar kinds of feedback together and deal with them all at once. For example, if a bunch of people have left “Confusing” feedback on a page, we can look at that all at once.
How we started: read existing feedback
We figured out the categories by looking at feedback I’d gotten on previous zines and trying to categorize it. Here are the 5 categories we ended up with.
category 1: “I learned something”
The whole goal of the zines is to teach people things, so “I learned something!” is kind of the gold star. If we’re getting this kind of feedback, we’re doing our job.
category 2: “I love this”
We noticed a lot of feedback where the person didn’t specifically say that they learned anything, but just seemed to like the page.
I was originally kind of against this category (“the point is for people to learn things!“), but we ended up including this because there was a lot of this type of feedback and I’m super happy we did.
It’s always very encouraging to see all the hearts, and usually we just take it as a signal that we should keep that page.
category 3: “I have a question”
The idea here is to gather specific questions about something the reader didn’t understand. For example, here are some of the excellent questions readers left on early drafts of the How DNS Works:
- what is a “domain”?
- why do we need to map a domain name to an IP address?
- are these all the DNS record types?
- are the DNS query and response between resolver (function) and resolver (server) the exact same format as between resolver (server) and authoritative nameservers?
- do authoritative nameservers push updates to resolvers or do resolvers “check” frequently to update their caches?
- does my local computer cache DNS query responses at all?
- is the resolver built into the browser or is this a server the browser knows to go and query?
Questions aren’t always a bad thing – sometimes the question indicates that the reader understood the topic well, is curious, and has some followup questions that are outside of the scope of the zine.
But lot of these questions were definitely questions that we wanted the zine to answer, and we mostly took them as a sign that the explanations needed to be improved.
category 4: “I’m confused”
This was a category we actually didn’t have in our first version. But we noticed that we were getting a lot of suggestions that essentially amounted to “I’m confused”.
What we realized was – sometimes an explanation is so confusing that the reader isn’t able to formulate a specific question about what they don’t understand. Figuring out a specific question is hard, especially if the explanation you’re reading isn’t very clear!
A few great examples of “I’m confused” feedback on “How DNS Works”:
- I don’t get the last section in the response record, the “glue records”
- This section is over my head…
- I would really appreciate some kind of simple index on what types of NS records exist and how they relate.
- I didn’t see where SOA records were defined. Did I miss something earlier or later?
- I was confused here by the server word again, due to it being able to refer to a resolver / nameserver. In this case, server => resolver
People also leave a lot of feedback of the form “I was initially confused by X, but then I figured it out”, which is great.
category 5: “I have a suggestion”
The last category is a kind of catchall “other” category for anything that doesn’t fit in the others. We usually ask people not to point out typos or mistakes, but sometimes people do anyway, which is fine.
we listen to learners, not experts
The goal is to get beta reader feedback from people who are trying to learn the material, not from experts.
Because of this, we’ll almost always prioritize “I’m confused” or “I have a question” feedback over “I have a suggestion” feedback, unless the person leaving the suggestion is someone who I know and whose judgement I trust.
If beta readers are learning things and they’re not too confused – we’re doing our job! It’s working!
Technical review and copy editing come at the end of the process, and I’m not going to talk about them in this post.
a gif of the zine feedback site
Here’s what the feedback site looks like as a beta reader:
Here’s a screenshot of all the feedback categories:
the admin interface
Next, there’s an admin interface where I
- check off comments as they’re handled
- add my own comments
I’m going to share a couple of examples of pages from the admin section, one where I think the feedback is more positive than the other.
Both of these pages are from a VERY early draft, and they’ve already been edited quite a bit :)
a “good” page
I’ve blurred out all the comments, but the important thing here is the emojis: there are a couple of lightbulbs (“I learned something!”) and a couple of hearts (“I love this!”).
Even without reading anything, this tells me that this page has some promise – there are definitely things to be improved, but people like it.
positive emojis are incredibly helpful
Being able to quickly scan through the zine and say “okay, this has 10 hearts and 7 lightbulbs, obviously people love this page” is amazing: it makes it really easy to tell when a page is working.
This is good because:
- it tells us what we don’t need to work on
- it’s motivating (“we’re getting somewhere! people like this!”)
a “bad” page
Next, here’s an example of another page in the admin interface where things aren’t going so well.
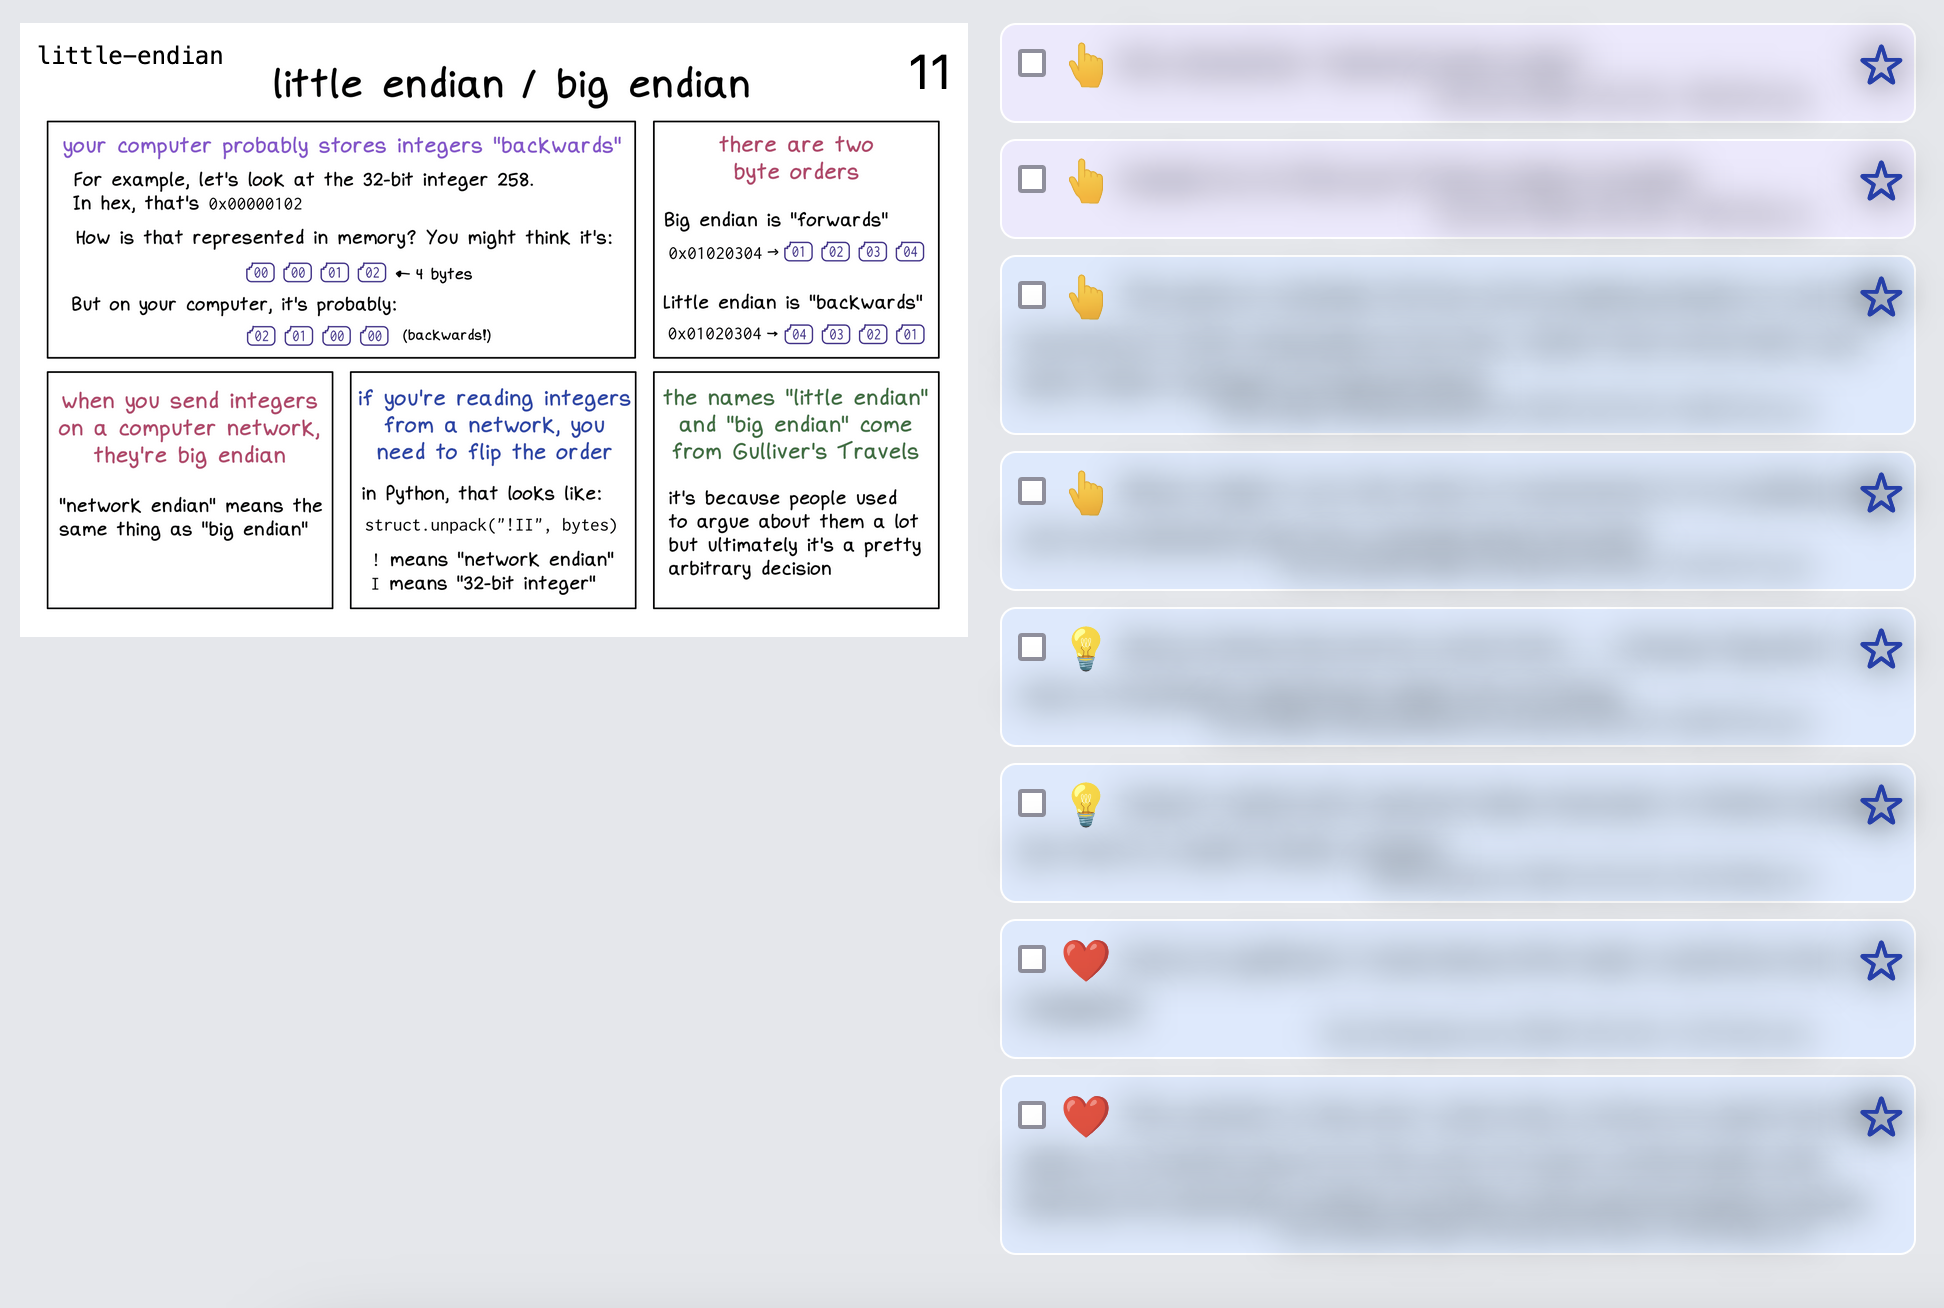
You’ll notice this page only has question marks and suggestions. (the ones in purple are comments that I wrote, the ones in blue are from readers)
The comments are blurred out, but several of them are about how the Rust panel seems arbitrary. That was something I kind of knew already, but hearing it from readers is really helpful and helps me know that I should prioritize fixing it.
confusion emojis are also super helpful
If we see a lot of “I’m confused” and “I have a suggestion” emojis on a page, that’s also very useful!
Sometimes we’ll react to that by totally rewriting or deleting a page, and then doing another round of feedback to see if the problems have been fixed.
“I have a question” emojis aren’t always a bad thing – sometimes the question indicates that the reader understood the topic well, is curious, and has some followup questions that are outside of the scope of the zine.
pages with no feedback
There are usually one or two pages that get no comments at all from beta readers. A couple of ways we handle this:
- ask a trusted friend for their take on the page
- post it to Mastodon or Twitter and see what the comments are like
- follow our gut (“no, I think this is important, let’s keep it”)
overall feedback
Readers can also enter overall feedback at the end. Here’s what that looks like in the admin interface (again blurred out).
This is a super useful section – sometimes people will leave comments here like “I didn’t really understand X”, and it’ll make it clear that we really need to improve the explanation of X.

the tech stack
I said earlier that writing the code was the easy part so I won’t talk about the code too much. Here are a few facts about the tech stack though. It has:
- a Go backend (which becomes a static binary)
- a SQLite database
- a Vue.js frontend
- a DigitalOcean server
some more notes on how it works:
- all of the zine pages are committed into the Git repository and compiled into the Go binary. (It might be smarter to store them in the database instead, but I didn’t do that, maybe one day!)
- the pages are password-protected, and I email people the password when I ask them for feedback
- when I want to deploy, I rebuild the Go binary locally (using tinybuild), scp it to the DigitalOcean server, and restart the systemd process.
It’s not open source and nobody else can use it because it’s very heavily customized to my use case, completely undocumented, and I made the questionable design choice to store all of the zine pages in the git repository :). I occasionally think about improving it so that other people can use it, but I think there’s a strong change I will never feel motivated to do that.
having a dedicated site for feedback has made a huge difference
We originally built this site in summer 2021, and so far have used it for How DNS Works, The Pocket Guide to Debugging, and the currently-in-progress zine on how computers represent data in binary in memory.
It’s made it possible to get feedback from dozens of people instead of just 3 or 4, and I think it’s really improved the zines’ quality.
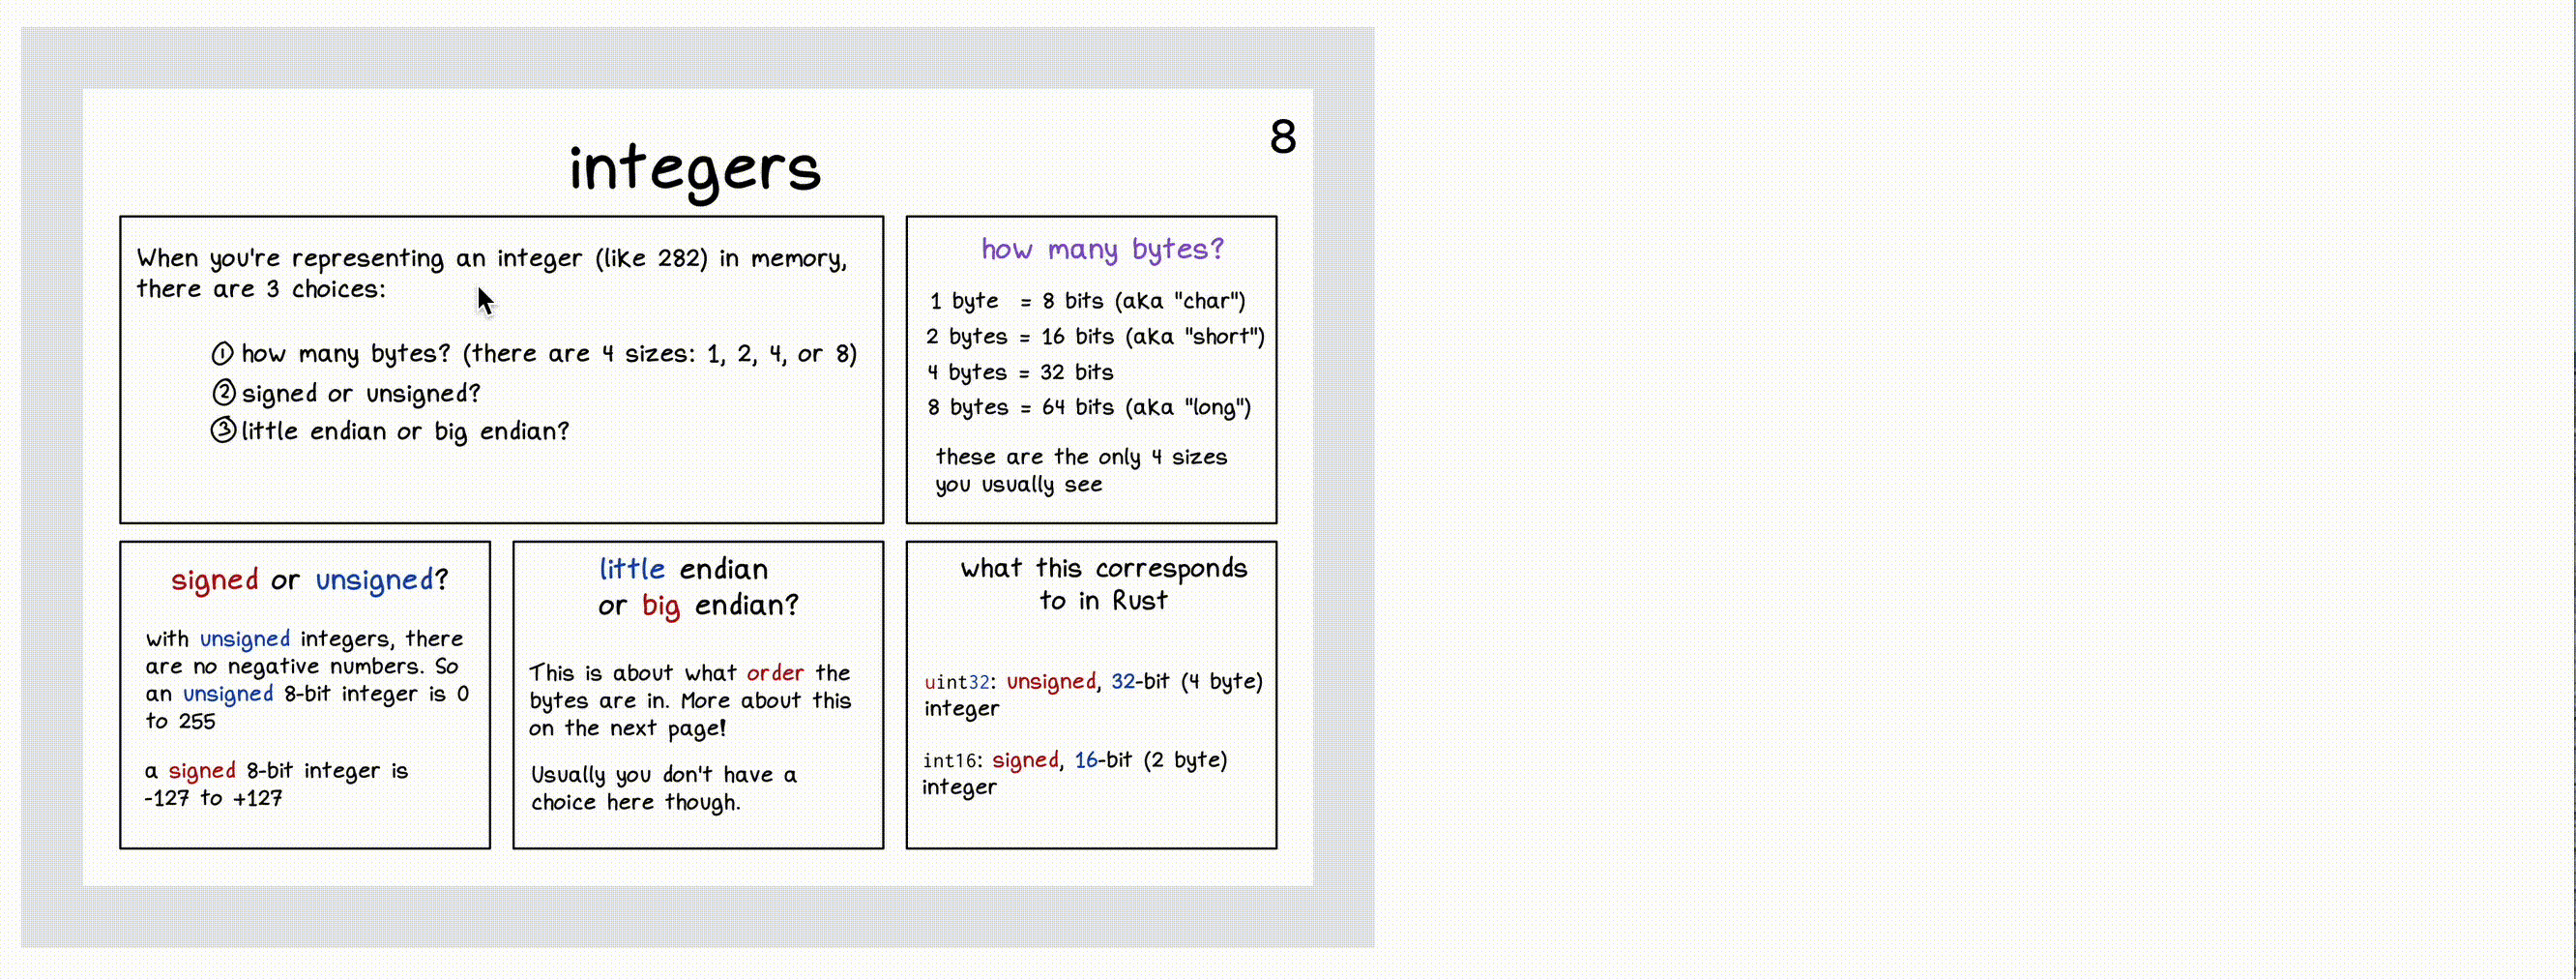
Some possible reasons for 8-bit bytes
I’ve been working on a zine about how computers represent thing in binary, and one question I’ve gotten a few times is – why does the x86 architecture use 8-bit bytes? Why not some other size?
With any question like this, I think there are two options:
- It’s a historical accident, another size (like 4 or 6 or 16 bits) would work just as well
- 8 bits is objectively the Best Option for some reason, even if history had played out differently we would still use 8-bit bytes
- some mix of 1 & 2
I’m not super into computer history (I like to use computers a lot more than I like reading about them), but I am always curious if there’s an essential reason for why a computer thing is the way it is today, or whether it’s mostly a historical accident. So we’re going to talk about some computer history.
As an example of a historical accident: DNS has a class field which has 5
possible values (“internet”, “chaos”, “hesiod”, “none”, and “any”). To me that’s
a clear example of a historical accident – I can’t imagine that we’d define
the class field the same way if we could redesign DNS today without worrying about backwards compatibility. I’m
not sure if we’d use a class field at all!
There aren’t any definitive answers in this post, but I asked on Mastodon and here are some potential reasons I found for the 8-bit byte. I think the answer is some combination of these reasons.
what’s the difference between a byte and a word?
First, this post talks about “bytes” and “words” a lot. What’s the difference between a byte and a word? My understanding is:
- the byte size is the smallest unit you can address. For example in a program on my machine
0x20aa87c68might be the address of one byte, then0x20aa87c69is the address of the next byte. - The word size is some multiple of the byte size. I’ve been confused about this for years, and the Wikipedia definition is incredibly vague (“a word is the natural unit of data used by a particular processor design”). I originally thought that the word size was the same as your register size (64 bits on x86-64). But according to section 4.1 (“Fundamental Data Types”) of the Intel architecture manual, on x86 a word is 16 bits even though the registers are 64 bits. So I’m confused – is a word on x86 16 bits or 64 bits? Can it mean both, depending on the context? What’s the deal?
Now let’s talk about some possible reasons that we use 8-bit bytes!
reason 1: to fit the English alphabet in 1 byte
This Wikipedia article says that the IBM System/360 introduced the 8-bit byte in 1964.
Here’s a video interview with Fred Brooks (who managed the project) talking about why. I’ve transcribed some of it here:
… the six bit bytes [are] really better for scientific computing and the 8-bit byte ones are really better for commercial computing and each one can be made to work for the other. So it came down to an executive decision and I decided for the 8-bit byte, Jerry’s proposal.
[….]
My most important technical decision in my IBM career was to go with the 8-bit byte for the 360. And on the basis of I believe character processing was going to become important as opposed to decimal digits.
It makes sense that an 8-bit byte would be better for text processing: 2^6 is 64, so 6 bits wouldn’t be enough for lowercase letters, uppercase letters, and symbols.
To go with the 8-bit byte, System/360 also introduced the EBCDIC encoding, which is an 8-bit character encoding.
It looks like the next important machine in 8-bit-byte history was the Intel 8008, which was built to be used in a computer terminal (the Datapoint 2200). Terminals need to be able to represent letters as well as terminal control codes, so it makes sense for them to use an 8-bit byte. This Datapoint 2200 manual from the Computer History Museum says on page 7 that the Datapoint 2200 supported ASCII (7 bit) and EBCDIC (8 bit).
why was the 6-bit byte better for scientific computing?
I was curious about this comment that the 6-bit byte would be better for scientific computing. Here’s a quote from this interview from Gene Amdahl:
I wanted to make it 24 and 48 instead of 32 and 64, on the basis that this would have given me a more rational floating point system, because in floating point, with the 32-bit word, you had to keep the exponent to just 8 bits for exponent sign, and to make that reasonable in terms of numeric range it could span, you had to adjust by 4 bits instead of by a single bit. And so it caused you to lose some of the information more rapidly than you would with binary shifting
I don’t understand this comment at all – why does the exponent have to be 8 bits if you use a 32-bit word size? Why couldn’t you use 9 bits or 10 bits if you wanted? But it’s all I could find in a quick search.
why did mainframes use 36 bits?
Also related to the 6-bit byte: a lot of mainframes used a 36-bit word size. Why? Someone pointed out that there’s a great explanation in the Wikipedia article on 36-bit computing:
Prior to the introduction of computers, the state of the art in precision scientific and engineering calculation was the ten-digit, electrically powered, mechanical calculator… These calculators had a column of keys for each digit, and operators were trained to use all their fingers when entering numbers, so while some specialized calculators had more columns, ten was a practical limit
Early binary computers aimed at the same market therefore often used a 36-bit word length. This was long enough to represent positive and negative integers to an accuracy of ten decimal digits (35 bits would have been the minimum)
So this 36 bit thing seems to based on the fact that log_2(20000000000) is 34.2. Huh.
My guess is that the reason for this is in the 50s, computers were extremely expensive. So if you wanted your computer to support ten decimal digits, you’d design so that it had exactly enough bits to do that, and no more.
Today computers are way faster and cheaper, so if you want to represent ten decimal digits for some reason you can just use 64 bits – wasting a little bit of space is usually no big deal.
Someone else mentioned that some of these machines with 36-bit word sizes let you choose a byte size – you could use 5 or 6 or 7 or 8-bit bytes, depending on the context.
reason 2: to work well with binary-coded decimal
In the 60s, there was a popular integer encoding called binary-coded decimal (or BCD for short) that encoded every decimal digit in 4 bits.
For example, if you wanted to encode the number 1234, in BCD that would be something like:
0001 0010 0011 0100
So if you want to be able to easily work with binary-coded decimal, your byte size should be a multiple of 4 bits, like 8 bits!
why was BCD popular?
This integer representation seemed really weird to me – why not just use binary, which is a much more efficient way to store integers? Efficiency was really important in early computers!
My best guess about why is that early computers didn’t have displays the same way we do now, so the contents of a byte were mapped directly to on/off lights.
Here’s a picture from Wikipedia of an IBM 650 with some lights on its display (CC BY-SA 3.0):

So if you want people to be relatively able to easily read off a decimal number from its binary representation, this makes a lot more sense. I think today BCD is obsolete because we have displays and our computers can convert numbers represented in binary to decimal for us and display them.
Also, I wonder if BCD is where the term “nibble” for 4 bits comes from – in the context of BCD, you end up referring to half bytes a lot (because every digits is 4 bits). So it makes sense to have a word for “4 bits”, and people called 4 bits a nibble. Today “nibble” feels to me like an archaic term though – I’ve definitely never used it except as a fun fact (it’s such a fun word!). The Wikipedia article on nibbles supports this theory:
The nibble is used to describe the amount of memory used to store a digit of a number stored in packed decimal format (BCD) within an IBM mainframe.
Another reason someone mentioned for BCD was financial calculations. Today if you want to store a dollar amount, you’ll typically just use an integer amount of cents, and then divide by 100 if you want the dollar part. This is no big deal, division is fast. But apparently in the 70s dividing an integer represented in binary by 100 was very slow, so it was worth it to redesign how you represent your integers to avoid having to divide by 100.
Okay, enough about BCD.
reason 3: 8 is a power of 2?
A bunch of people said it’s important for a CPU’s byte size to be a power of 2. I can’t figure out whether this is true or not though, and I wasn’t satisfied with the explanation that “computers use binary so powers of 2 are good”. That seems very plausible but I wanted to dig deeper. And historically there have definitely been lots of machines that used byte sizes that weren’t powers of 2, for example (from this retro computing stack exchange thread):
- Cyber 180 mainframes used 6-bit bytes
- the Univac 1100 / 2200 series used a 36-bit word size
- the PDP-8 was a 12-bit machine
Some reasons I heard for why powers of 2 are good that I haven’t understood yet:
- every bit in a word needs a bus, and you want the number of buses to be a power of 2 (why?)
- a lot of circuit logic is susceptible to divide-and-conquer techniques (I think I need an example to understand this)
Reasons that made more sense to me:
- it makes it easier to design clock dividers that can measure “8 bits were sent on this wire” that work based on halving – you can put 3 halving clock dividers in series. Graham Sutherland told me about this and made this really cool simulator of clock dividers showing what these clock dividers look like. That site (Falstad) also has a bunch of other example circuits and it seems like a really cool way to make circuit simulators.
- if you have an instruction that zeroes out a specific bit in a byte, then if your byte size is 8 (2^3), you can use just 3 bits of your instruction to indicate which bit. x86 doesn’t seem to do this, but the Z80’s bit testing instructions do.
- someone mentioned that some processors use Carry-lookahead adders, and they work in groups of 4 bits. From some quick Googling it seems like there are a wide variety of adder circuits out there though.
- bitmaps: Your computer’s memory is organized into pages (usually of size 2^n). It needs to keep track of whether every page is free or not. Operating systems use a bitmap to do this, where each bit corresponds to a page and is 0 or 1 depending on whether the page is free. If you had a 9-bit byte, you would need to divide by 9 to find the page you’re looking for in the bitmap. Dividing by 9 is slower than dividing by 8, because dividing by powers of 2 is always the fastest thing.
I probably mangled some of those explanations pretty badly: I’m pretty far out of my comfort zone here. Let’s move on.
reason 4: small byte sizes are good
You might be wondering – well, if 8-bit bytes were better than 4-bit bytes, why not keep increasing the byte size? We could have 16-bit bytes!
A couple of reasons to keep byte sizes small:
- It’s a waste of space – a byte is the minimum unit you can address, and if your computer is storing a lot of ASCII text (which only needs 7 bits), it would be a pretty big waste to dedicate 12 or 16 bits to each character when you could use 8 bits instead.
- As bytes get bigger, your CPU needs to get more complex. For example you need one bus line per bit. So I guess simpler is better.
My understanding of CPU architecture is extremely shaky so I’ll leave it at that. The “it’s a waste of space” reason feels pretty compelling to me though.
reason 5: compatibility
The Intel 8008 (from 1972) was the precursor to the 8080 (from 1974), which was the precursor to the 8086 (from 1976) – the first x86 processor. It seems like the 8080 and the 8086 were really popular and that’s where we get our modern x86 computers.
I think there’s an “if it ain’t broke don’t fix it” thing going on here – I assume that 8-bit bytes were working well, so Intel saw no need to change the design. If you keep the same 8-bit byte, then you can reuse more of your instruction set.
Also around the 80s we start getting network protocols like TCP which use 8-bit bytes (usually called “octets”), and if you’re going to be implementing network protocols, you probably want to be using an 8-bit byte.
that’s all!
It seems to me like the main reasons for the 8-bit byte are:
- a lot of early computer companies were American, the most commonly used language in the US is English
- those people wanted computers to be good at text processing
- smaller byte sizes are in general better
- 7 bits is the smallest size you can fit all English characters + punctuation in
- 8 is a better number than 7 (because it’s a power of 2)
- once you have popular 8-bit computers that are working well, you want to keep the same design for compatibility
Someone pointed out that page 65 of this book from 1962 talking about IBM’s reasons to choose an 8-bit byte basically says the same thing:
- Its full capacity of 256 characters was considered to be sufficient for the great majority of applications.
- Within the limits of this capacity, a single character is represented by a single byte, so that the length of any particular record is not dependent on the coincidence of characters in that record.
- 8-bit bytes are reasonably economical of storage space
- For purely numerical work, a decimal digit can be represented by only 4 bits, and two such 4-bit bytes can be packed in an 8-bit byte. Although such packing of numerical data is not essential, it is a common practice in order to increase speed and storage efficiency. Strictly speaking, 4-bit bytes belong to a different code, but the simplicity of the 4-and-8-bit scheme, as compared with a combination 4-and-6-bit scheme, for example, leads to simpler machine design and cleaner addressing logic.
- Byte sizes of 4 and 8 bits, being powers of 2, permit the computer designer to take advantage of powerful features of binary addressing and indexing to the bit level (see Chaps. 4 and 5 ) .
Overall this makes me feel like an 8-bit byte is a pretty natural choice if you’re designing a binary computer in an English-speaking country.